
Setting up a Blog Server using Docker

Installing and Securing Ghost
Mac Mini · Docker · Nginx Proxy Manager · Mailrelay
Ghost is the publishing platform behind the Plainshawk blog. This guide documents my current self-hosted installation: Ghost running in Docker on a Mac Mini, backed by MySQL, with Nginx Proxy Manager providing external HTTPS access and a separate mail relay handling outgoing email.
The aim isn't simply to get Ghost running. The configuration below is designed to avoid several problems I encountered while building and rebuilding the installation, particularly around database persistence, Docker startup order, email delivery and Ghost's newer ActivityPub functionality.
The resulting architecture is:
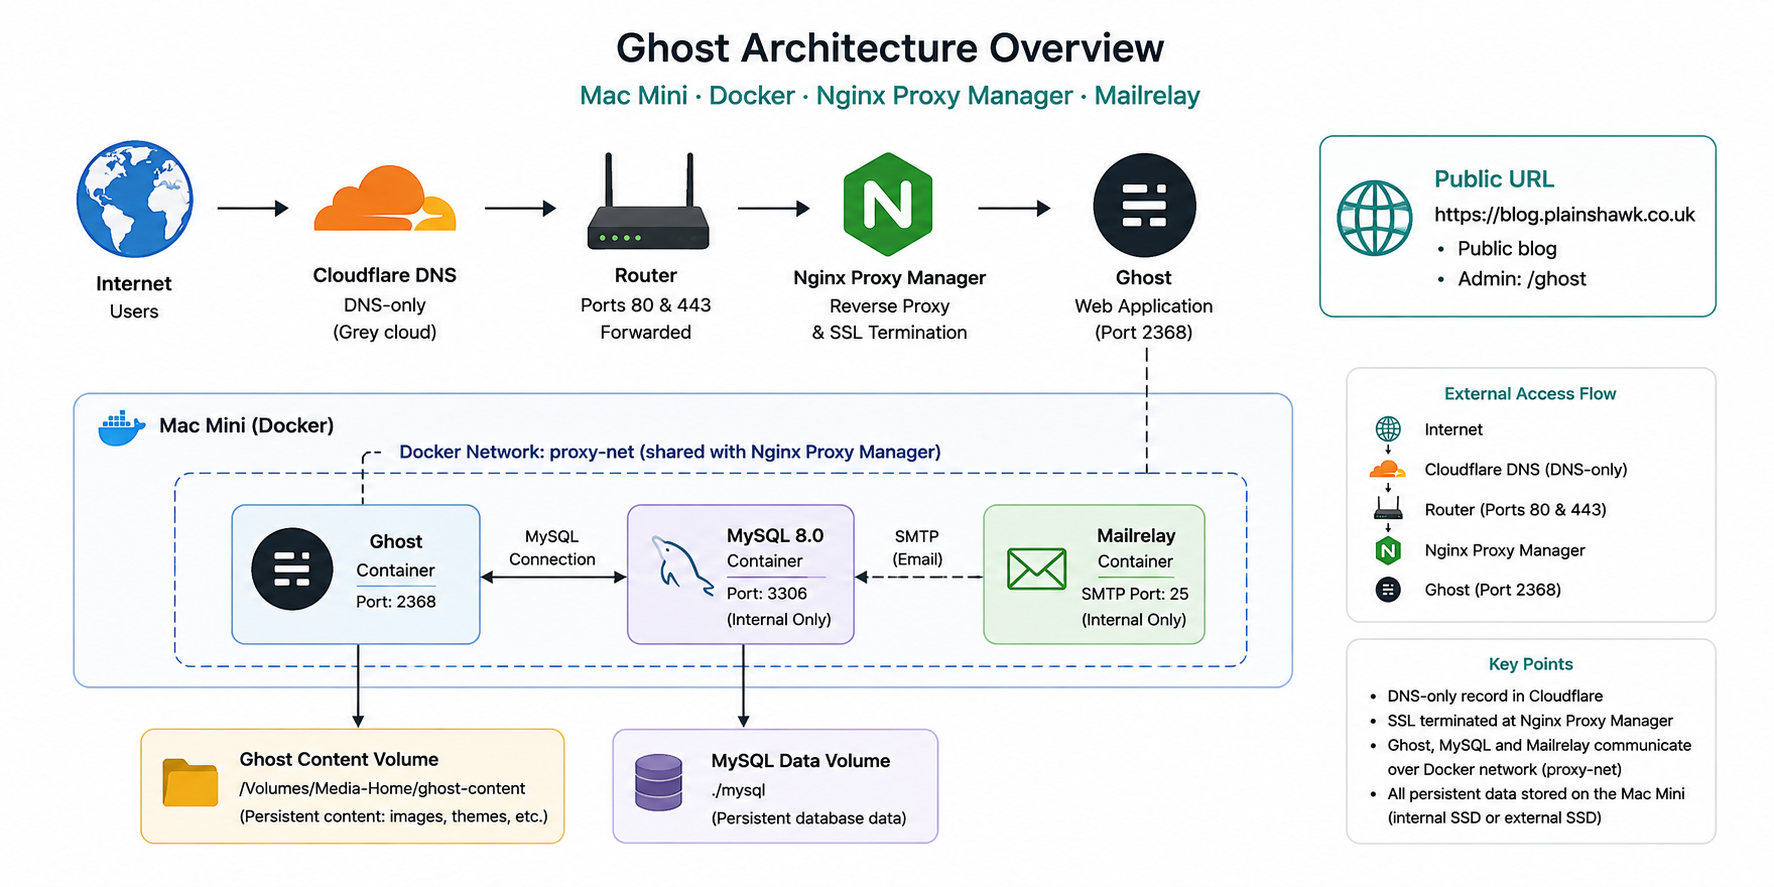
with Ghost's persistent content stored on the external SSD:
/Volumes/Media-Home/ghost-content
Key lessons from my installation
These are the problems this guide specifically addresses.
- The MySQL database volume must be explicitly mounted. Otherwise database data can be lost when the container is removed.
- Environment variables must not have comments appended to the same line. Ghost can silently fall back to SQLite if the MySQL configuration isn't parsed correctly.
- Ghost 6.x ActivityPub can make outbound HTTPS requests to itself during startup. In this setup, ActivityPub is disabled.
- Ghost needs
tls__rejectUnauthorized=falseto communicate with the internal mail relay. - The MySQL healthcheck prevents Ghost from trying to connect before the database is ready.
privacy__useFavicon=falseavoids an SSL self-reference error encountered during startup.
These details are specific to the configuration described in this guide, but they're also useful lessons if you're troubleshooting a similar Ghost/Docker installation.
My environment
| Component | Configuration |
|---|---|
| Host | Mac Mini |
| Container platform | Docker Desktop |
| Blog platform | Ghost |
| Database | MySQL 8.0 |
| Reverse proxy | Nginx Proxy Manager |
| DNS | Cloudflare, DNS-only |
| Internal mail relay | |
| Ghost hostname | blog.plainshawk.co.uk |
| Content storage | /Volumes/Media-Home/ghost-content |
| Docker network | proxy-net |
Before you start
You will need:
- Docker Desktop running
- An existing Docker network called
proxy-net - The mailrelay container running
- Ports 80 and 443 forwarded on your router
- A Cloudflare A record for
blog.plainshawk.co.ukpointing to your public IP - The Cloudflare record set to DNS only (grey cloud)
proxy-net before startingThe Ghost container needs to share a Docker network with Nginx Proxy Manager.
You can check that the network exists with:
docker network inspect proxy-net
If it doesn't exist, create it before continuing.
Contents
- Stage 1 — Create the directory structure
- Stage 2 — Create the Compose file
- Stage 3 — Create the content directory
- Stage 4 — Add the DNS record
- Stage 5 — Start Ghost
- Stage 6 — Verify MySQL is being used
- Stage 7 — Configure Nginx Proxy Manager
- Stage 8 — Complete the initial Ghost setup
- Stage 9 — Configure Ghost
- Stage 10 — Verify email delivery
- Stage 11 — Add a pre-operation backup
- Stage 12 — Add Ghost to the nightly backup
- Stage 13 — Add Ghost to the startup script
- Stage 14 — Add Ghost to Uptime Kuma
- Quick reference
- Troubleshooting
Installation
Stage 1 — Create the directory structure
I keep each Docker application in its own directory. This keeps the Compose file and Ghost-specific configuration together and makes the installation easier to maintain.
mkdir -p ~/docker/ghost
cd ~/docker/ghost
Stage 2 — Create the Compose file
Create the Docker Compose configuration:
nano docker-compose.yml
Paste the following complete Compose file.
There are several deliberately important details here, so I recommend using this configuration as a whole rather than trying to recreate it from memory.
Every environment variable below is on its own line.
For example, don't change:
- database__client=mysql
into:
- database__client=mysql # MySQL
The comment can become part of the value, preventing Ghost from interpreting the configuration correctly. In my case this resulted in Ghost silently falling back to SQLite.
services:
  ghost-db:
    image: mysql:8.0
    container_name: ghost-db
    restart: unless-stopped
    environment:
      - MYSQL_ROOT_PASSWORD=choose_a_root_password
      - MYSQL_DATABASE=ghost
      - MYSQL_USER=ghost
      - MYSQL_PASSWORD=choose_a_db_password
    volumes:
      - ./mysql:/var/lib/mysql
    healthcheck:
      test: ["CMD", "mysqladmin", "ping", "-u", "ghost", "-pchoose_a_db_password"]
      interval: 30s
      timeout: 10s
      retries: 5
      start_period: 30s

  ghost:
    image: ghost:latest
    container_name: ghost
    restart: unless-stopped
    depends_on:
      ghost-db:
        condition: service_healthy
    environment:
      - NODE_ENV=production
      - url=https://blog.plainshawk.co.uk
      - server__host=0.0.0.0
      - server__port=2368
      - database__client=mysql
      - database__connection__host=ghost-db
      - database__connection__database=ghost
      - database__connection__user=ghost
      - database__connection__password=choose_a_db_password
      - privacy__useUpdateCheck=false
      - privacy__useGravatar=false
      - privacy__useFavicon=false
      - imageOptimization__resize=false
      - activitypub__enabled=false
      - mail__transport=SMTP
      - mail__from=Plainshawk <noreply@plainshawk.co.uk>
      - mail__options__host=mailrelay
      - mail__options__port=25
      - mail__options__secure=false
      - mail__options__tls__rejectUnauthorized=false
    volumes:
      - /Volumes/Media-Home/ghost-content:/var/lib/ghost/content
    networks:
      - default
      - proxy-net

networks:
  default:
  proxy-net:
    external: true
Why these settings matter
There are four particularly important areas in this configuration.
MySQL persistence
volumes:
  - ./mysql:/var/lib/mysql
This keeps the MySQL database outside the disposable container.
Startup ordering
depends_on:
  ghost-db:
    condition: service_healthy
Ghost won't attempt to start until the MySQL healthcheck reports that the database is ready.
Persistent Ghost content
volumes:
  - /Volumes/Media-Home/ghost-content:/var/lib/ghost/content
Themes, images and other Ghost content are stored on the external SSD rather than inside the container.
Shared reverse-proxy network
networks:
  - default
  - proxy-net
This makes Ghost accessible to Nginx Proxy Manager without exposing port 2368 directly to the Internet.
Replace:
choose_a_root_passwordchoose_a_db_password
with strong, unique passwords.
The value of MYSQL_PASSWORD and the corresponding Ghost database password must match.
The password used by the MySQL healthcheck must also match MYSQL_PASSWORD exactly.
Stage 3 — Create the content directory
Create the directory that will hold Ghost's persistent content:
mkdir -p /Volumes/Media-Home/ghost-content
This directory will be mounted inside the Ghost container as:
/var/lib/ghost/content
Because this directory is on an external macOS volume, Docker Desktop must have permission to access /Volumes/Media-Home.
If Docker cannot mount the directory, check:
Docker Desktop → Settings → Resources → File Sharing
and make sure /Volumes/Media-Home is included.
Stage 4 — Add the DNS record
Create an A record in Cloudflare.
| Type | Name | Content | Proxy |
|---|---|---|---|
| A | blog |
Your public IP | Grey cloud — DNS only |
This should result in:
blog.plainshawk.co.uk → your public IP
In this configuration Cloudflare provides DNS but doesn't proxy the traffic. Nginx Proxy Manager on the Mac Mini handles the HTTPS connection and obtains the Let's Encrypt certificate.
Stage 5 — Start Ghost
Start the containers:
docker compose up -d
Then follow the Ghost logs:
docker compose logs -f ghost
Watch the startup sequence carefully.
You should see:
ghost-dbbecoming healthy- Ghost connecting to MySQL
- Ghost completing its startup
- A message similar to
Ghost boot X.x.x completed
The database may take 30–60 seconds to become ready.
The important thing at this stage is to confirm that Ghost is using MySQL, not SQLite.
If you see references to SQLite in the startup output, stop here and check the Compose file.
Pay particular attention to the database__client=mysql line and make sure it has no inline comment or other unexpected characters.
Press Ctrl+C once Ghost is running.
Now check both containers:
docker compose ps
Both ghost and ghost-db should be running.
Stage 6 — Verify MySQL is being used
Before configuring Nginx Proxy Manager, I want to verify that Ghost's database is actually MySQL.
Run:
docker exec ghost-db mysql \
  -u ghost \
  -pchoose_a_db_password \
  ghost \
  -e "SHOW TABLES;"
You should get a list of Ghost database tables.
The command should return Ghost's table list.
If it returns nothing, or if Ghost has created a fresh installation unexpectedly, stop and check the database configuration before proceeding.
Configure remote access
Stage 7 — Configure Nginx Proxy Manager
Once Ghost is working internally, configure Nginx Proxy Manager to make it available at:
https://blog.plainshawk.co.uk
Log into Nginx Proxy Manager and go to:
Proxy Hosts → Add Proxy Host
Details
| Field | Value |
|---|---|
| Domain | blog.plainshawk.co.uk |
| Scheme | http |
| Forward Hostname | ghost |
| Forward Port | 2368 |
| Cache Assets | Off |
| Block Common Exploits | On |
| Websockets Support | On |
SSL
On the SSL tab:
- Request a new Let's Encrypt certificate
- Force SSL: On
- HTTP/2 Support: On
Advanced configuration
The following configuration handles larger image/media uploads, increases the proxy timeouts and blocks several common automated scanner requests.
Ghost is a Node.js application and doesn't use PHP, WordPress or phpMyAdmin, so requests targeting those services can simply be rejected.
# Upload size for images and media
client_max_body_size 50M;

# Timeouts
proxy_read_timeout 300s;
proxy_send_timeout 300s;
proxy_buffering off;

# Block scanners — Ghost uses Node.js, no PHP
location ~ \.(php|php\d|phtml|asp|aspx|cgi)$ {
    return 444;
}
location ~ /(wp-admin|wp-login|wp-content|wp-includes|xmlrpc\.php) {
    return 444;
}
location ~ /\.(env|git|svn|aws|ssh|npmrc) {
    return 444;
}
location ~ /(phpmyadmin|pma|adminer|mysql)/ {
    return 444;
}
location ~ /(shell|cmd|exec|system|passthru|eval)/ {
    return 444;
}
Save the Proxy Host.
Configure Ghost
Stage 8 — Complete the initial Ghost setup
Open:
https://blog.plainshawk.co.uk/ghost
You should now see the Ghost setup wizard.
Complete the wizard:
- Create your admin account
- Use a strong password
- Store the password securely in Vaultwarden
- Publication name
Plainshawk
- Invite staff
- Skip this for now
- Choose a theme
- Casper is a clean starting point
After completing the wizard, Ghost should take you to the administration interface.
Stage 9 — Configure Ghost
Once you're logged in, open Settings.
General
Configure:
- Publication name
- Publication description
- Logo
- Favicon
- Timezone: London
Design
Configure:
- Theme
- Accent colour
- Navigation
- Other theme-specific options
For Plainshawk, I'm using the Casper theme as the foundation and then adding some custom styling through Ghost's Code Injection facility.
Email newsletter
Go to:
Settings → Email
Scroll down to Sending domain and set:
plainshawk.co.uk
Then send a test email.
It should be delivered through the mail relay.
Members
Go to:
Settings → Members
Decide whether you want to enable member signups.
If you intend to use Ghost's newsletter functionality, this is where you can enable the audience/member functionality.
If Plainshawk is primarily a traditional blog and you don't intend to build a newsletter audience, leaving member signups disabled keeps the installation simpler.
Stage 10 — Verify email delivery
Go to:
Settings → Email → Send test email
The test message should be delivered through the mail relay.
If the email doesn't arrive, check the mail relay logs:
cd ~/docker/mailrelay
docker compose logs --tail=20 mailrelay
The Ghost configuration deliberately contains:
mail__options__tls__rejectUnauthorized=false
This is required in this particular setup because Ghost is communicating with the internal mail relay using its certificate configuration.
Without it, Ghost rejects the relay's self-signed certificate.
Backups and maintenance
Stage 11 — Add a pre-operation backup
A database backup should be taken before making changes that could affect the Ghost installation.
I created a small shell function called ghost-backup so that taking a backup is quick and difficult to forget.
Open your shell configuration:
nano ~/.zshrc
Add:
ghost-backup() {
  DATE=$(date +%Y%m%d_%H%M%S)
  echo "Backing up Ghost database..."
  docker exec ghost-db mysql \
    -u ghost \
    -pchoose_a_db_password \
    ghost > /Users/gavin/docker/backups/ghost_preop_$DATE.sql
  echo "Done — saved as ghost_preop_$DATE.sql"
}
Reload the configuration:
source ~/.zshrc
You can now create a pre-operation backup simply by running:
ghost-backup
Always run ghost-backup before performing an operation that involves taking Ghost or MySQL down, changing the database configuration, or otherwise making a potentially destructive change.
Stage 12 — Add Ghost to the nightly backup
Ghost's database should also be included in the regular nightly backup.
Open the backup script:
nano ~/docker/backups/backup.sh
Confirm that this section is present:
# Ghost
docker exec ghost-db mysql \
  -u ghost \
  -pchoose_a_db_password \
  ghost > $BACKUP_DIR/ghost_$DATE.sql \
  2>/dev/null
echo "Ghost backup done"
This gives you an independent SQL dump of the Ghost database every night.
The MySQL backup protects Ghost's database, but your Ghost content directory also needs to be included in your normal filesystem backup.
The persistent content is stored at:
/Volumes/Media-Home/ghost-content
That directory contains important Ghost assets such as uploaded images and themes.
Stage 13 — Add Ghost to the startup script
If you use a startup script to bring your Docker services online after a reboot, add Ghost after the mail relay.
Open:
nano ~/docker/start-all.sh
Confirm that this section is present:
echo "Starting Ghost..."
cd /Users/gavin/docker/ghost && docker compose up -d
Starting Ghost after the mail relay ensures that the dependency is already available when Ghost starts.
Stage 14 — Add Ghost to Uptime Kuma
I use Uptime Kuma to monitor the services running on the Mac Mini.
Add a monitor at:
https://status.plainshawk.co.uk
| Field | Value |
|---|---|
| Name | Blog |
| Monitor Type | HTTP(s) |
| URL | http://ghost:2368 |
| Heartbeat Interval | 60s |
| Retries | 3 |
The monitor checks Ghost from within the Docker environment rather than relying on the external Internet connection.
Quick reference
| URL | Purpose |
|---|---|
https://blog.plainshawk.co.uk |
Public blog |
https://blog.plainshawk.co.uk/ghost |
Ghost administration |
Troubleshooting
Ghost uses SQLite instead of MySQL
This is one of the most important problems to check.
The first thing to inspect is:
- database__client=mysql
Make sure there is no inline comment after the value.
For example, don't use:
- database__client=mysql # MySQL
Use:
- database__client=mysql
If Ghost has started using SQLite, stop the installation and correct the Compose file before adding content.
Startup error: Cannot GET /.ghost/activitypub
Ghost 6.x includes ActivityPub functionality that can make outbound HTTPS requests to the site itself.
In this installation I don't need ActivityPub, so it is explicitly disabled:
- activitypub__enabled=false
After changing the Compose file, recreate the Ghost container:
docker compose down
docker compose up -d
Because this involves taking the application down, run:
ghost-backup
before performing the operation.
Emails aren't sending
First check that this setting is present:
- mail__options__tls__rejectUnauthorized=false
Without it, Ghost may reject the self-signed certificate used by the internal mail relay.
Then inspect the mail relay logs:
cd ~/docker/mailrelay
docker compose logs --tail=20 mailrelay
Ghost loops or shows a fresh installation after down && up
Check the MySQL volume.
The ghost-db service must contain:
volumes:
  - ./mysql:/var/lib/mysql
Without this persistent volume, the MySQL data exists only inside the container and can disappear when the container is removed.
If you have already lost the database, restore the most recent Ghost SQL backup before proceeding.
ghost-db healthcheck is failing
Check the healthcheck:
healthcheck:
  test: ["CMD", "mysqladmin", "ping", "-u", "ghost", "-pchoose_a_db_password"]
The password in the healthcheck must exactly match:
MYSQL_PASSWORD=choose_a_db_password
Check carefully for:
- Typographical errors
- Different passwords
- Missing characters
- Accidental spaces
Ghost content isn't persisting
Check that:
volumes:
  - /Volumes/Media-Home/ghost-content:/var/lib/ghost/content
is present.
Then confirm that /Volumes/Media-Home is available to Docker Desktop:
Docker Desktop → Settings → Resources → File Sharing
The directory should be accessible from Docker.
Final checks
Before considering the installation complete, I recommend checking each of these:
- [ ] Ghost starts successfully
- [ ]
ghost-dbreports healthy - [ ] Ghost is using MySQL rather than SQLite
- [ ] MySQL data is stored in
./mysql - [ ] Ghost content is stored on
/Volumes/Media-Home/ghost-content - [ ]
blog.plainshawk.co.ukresolves correctly - [ ] Nginx Proxy Manager provides the HTTPS certificate
- [ ] The Ghost administration interface is accessible
- [ ] Email test succeeds
- [ ] Pre-operation database backup works
- [ ] Nightly backup includes Ghost
- [ ] Ghost is included in the startup script
- [ ] Uptime Kuma monitors the service
Finished
At this point Ghost is running as a persistent Docker service on the Mac Mini, with MySQL providing the database, the external SSD storing Ghost's content, Nginx Proxy Manager handling HTTPS access and the mail relay handling outgoing email.
The important part of this installation isn't simply getting Ghost to start. The configuration also makes the installation persistent, recoverable and maintainable.
The database has its own persistent volume and regular backups, Ghost waits for MySQL to become healthy before starting, the reverse proxy is isolated from the public Internet, and the service is included in the Mac Mini's startup and monitoring arrangements.
That gives Plainshawk a solid self-hosted foundation while retaining the convenience of Ghost's publishing interface.