Setting up a Document Store under Docker

Installing and Securing Paperless-ngx
Mac Mini · Docker · Nginx Proxy Manager · PostgreSQL · Mailrelay
Paperless-ngx is my self-hosted document management system. It provides a searchable archive for scanned documents, PDFs, correspondence, bills and other important paperwork.
This installation runs on a Mac Mini using Docker, with PostgreSQL providing the database, Redis handling background tasks, Apache Tika and Gotenberg providing document conversion, and Nginx Proxy Manager providing HTTPS access.
There is one particularly important difference from some of my other self-hosted services:
Paperless contains sensitive personal documents, so it should not be exposed to the public Internet.
The installation therefore uses Nginx Proxy Manager to restrict access to the home network while still allowing the Paperless container to be monitored internally by Uptime Kuma.
Architecture
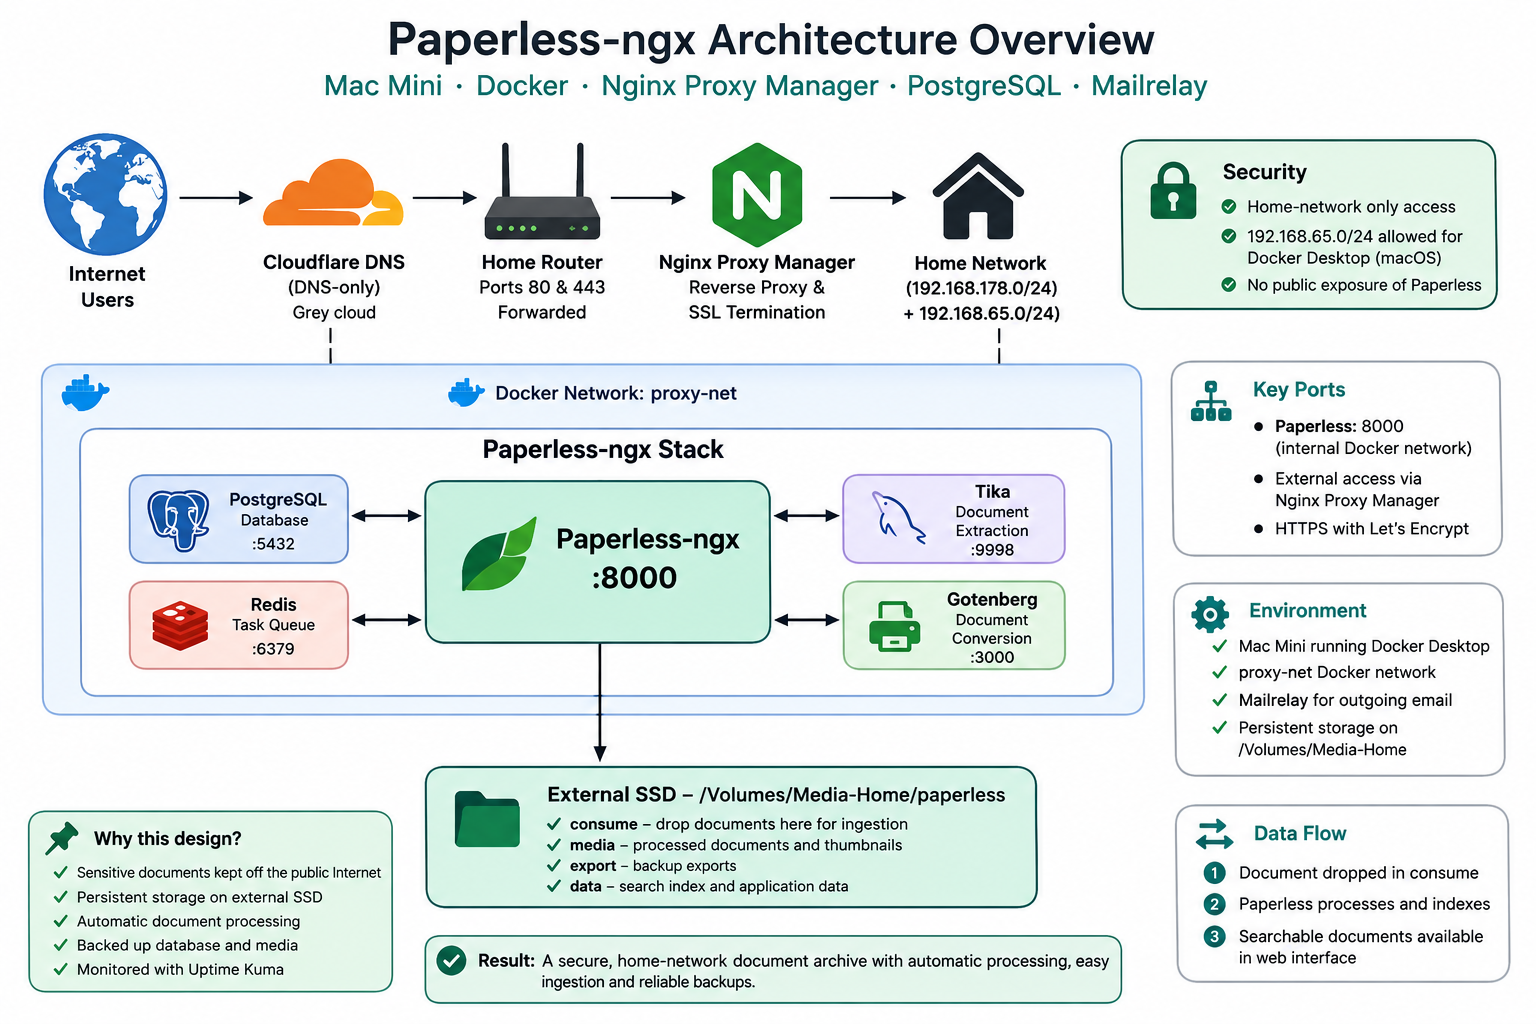
The important point is that only Nginx Proxy Manager provides the externally reachable HTTP/HTTPS entry point. PostgreSQL, Redis, Tika, Gotenberg and Paperless itself are not directly exposed to the Internet.
Key lessons from this installation
Several details in this installation are the result of problems encountered while setting up the service.
- The old
ghcr.io/paperless-ngx/tikaimage is no longer publicly accessible. Usedocker.io/apache/tikainstead. - All Paperless data and media are stored on
/Volumes/Media-Home/paperless, rather than consuming space on the Mac’s system SSD. - Paperless is deliberately restricted to the home network because it contains sensitive personal documents.
- Nginx Proxy Manager needs
192.168.65.0/24in its allow list on macOS because Docker Desktop uses this network as its VM gateway. - The
consumedirectory is the simplest way to ingest documents, so I’ve added it to the Finder sidebar. - PostgreSQL is persistent and separately backed up.
- The processed document collection in
mediais also backed up because those documents are irreplaceable.
Before you start
You will need:
- Docker Desktop running
- The
proxy-netDocker network already created - The Mailrelay container running
- Ports 80 and 443 forwarded on your router
- A Cloudflare A record for
docs.plainshawk.co.uk - The Cloudflare record set to DNS only — grey cloud
Paperless is different from a public-facing blog.
Your Paperless library may contain:
- bank statements
- tax documents
- insurance documents
- medical correspondence
- utility bills
- contracts
- identification documents
For that reason, this installation deliberately restricts access to the home network.
Installation
Stage 1 — Create the directory structure
The Docker Compose configuration will live on the Mac’s internal storage, but the Paperless data itself belongs on the large external SSD.
Create the directories:
mkdir -p ~/docker/paperless

mkdir -p /Volumes/Media-Home/paperless/consume
mkdir -p /Volumes/Media-Home/paperless/media
mkdir -p /Volumes/Media-Home/paperless/export
mkdir -p /Volumes/Media-Home/paperless/data

cd ~/docker/paperless
The resulting structure is:
Directory | Purpose |
|---|---|
| Documents waiting to be imported |
| Processed documents and thumbnails |
| Paperless export files |
| Search index and application data |
The PostgreSQL database will be stored separately in:
~/docker/paperless/postgresStage 2 — Generate a secret key
Paperless needs a secret key for cryptographic operations.
Generate one with:
openssl rand -base64 48Copy the resulting value somewhere temporarily.
You will need it in the Compose file in the next step.
Treat the Paperless secret key in the same way as a password. Don’t publish it in your blog, commit it to a public Git repository or share it unnecessarily.
Stage 3 — Create the Compose file
Create the Docker Compose configuration:
nano docker-compose.ymlPaste the following:
services:
  paperless-db:
    image: postgres:16
    container_name: paperless-db
    restart: unless-stopped
    environment:
      - POSTGRES_DB=paperless
      - POSTGRES_USER=paperless
      - POSTGRES_PASSWORD=choose_a_db_password
    volumes:
      - ./postgres:/var/lib/postgresql/data
    healthcheck:
      test: ["CMD-SHELL", "pg_isready -U paperless"]
      interval: 10s
      timeout: 5s
      retries: 5
      start_period: 30s

  paperless-redis:
    image: redis:alpine
    container_name: paperless-redis
    restart: unless-stopped
    healthcheck:
      test: ["CMD", "redis-cli", "ping"]
      interval: 10s
      timeout: 5s
      retries: 5
      start_period: 10s

  paperless-gotenberg:
    image: docker.io/gotenberg/gotenberg:8
    container_name: paperless-gotenberg
    restart: unless-stopped
    command:
      - gotenberg
      - --chromium-disable-javascript=true
      - --chromium-allow-list=file:///tmp/.*

  paperless-tika:
    image: docker.io/apache/tika:latest
    container_name: paperless-tika
    restart: unless-stopped

  paperless:
    image: ghcr.io/paperless-ngx/paperless-ngx:latest
    container_name: paperless
    restart: unless-stopped
    depends_on:
      paperless-db:
        condition: service_healthy
      paperless-redis:
        condition: service_healthy
      paperless-gotenberg:
        condition: service_started
      paperless-tika:
        condition: service_started
    environment:
      # Database
      - PAPERLESS_DBHOST=paperless-db
      - PAPERLESS_DBNAME=paperless
      - PAPERLESS_DBUSER=paperless
      - PAPERLESS_DBPASS=choose_a_db_password

      # Redis
      - PAPERLESS_REDIS=redis://paperless-redis:6379

      # Tika and Gotenberg
      - PAPERLESS_TIKA_ENABLED=1
      - PAPERLESS_TIKA_ENDPOINT=http://paperless-tika:9998
      - PAPERLESS_TIKA_GOTENBERG_ENDPOINT=http://paperless-gotenberg:3000

      # Application
      - PAPERLESS_URL=https://docs.plainshawk.co.uk
      - PAPERLESS_SECRET_KEY=your_generated_secret_key_here
      - PAPERLESS_TIME_ZONE=Europe/London
      - PAPERLESS_OCR_LANGUAGE=eng
      - PAPERLESS_ADMIN_USER=admin
      - PAPERLESS_ADMIN_PASSWORD=choose_an_admin_password
      - PAPERLESS_ADMIN_MAIL=gavin@plainshawk.co.uk

      # File locations
      - PAPERLESS_CONSUMPTION_DIR=/consume
      - PAPERLESS_MEDIA_ROOT=/media
      - PAPERLESS_DATA_DIR=/data
      - PAPERLESS_EXPORT_DIR=/export

      # OCR behaviour
      - PAPERLESS_OCR_MODE=skip
      - PAPERLESS_OCR_SKIP_ARCHIVE_FILE=with_text

      # Performance — conservative for Mac Mini
      - PAPERLESS_TASK_WORKERS=2
      - PAPERLESS_THREADS_PER_WORKER=1

      # Email via mailrelay
      - PAPERLESS_EMAIL_HOST=mailrelay
      - PAPERLESS_EMAIL_PORT=25
      - PAPERLESS_EMAIL_USE_TLS=false
      - PAPERLESS_EMAIL_FROM=paperless@plainshawk.co.uk

    volumes:
      - /Volumes/Media-Home/paperless/consume:/consume
      - /Volumes/Media-Home/paperless/media:/media
      - /Volumes/Media-Home/paperless/data:/data
      - /Volumes/Media-Home/paperless/export:/export

    networks:
      - default
      - proxy-net

networks:
  default:
  proxy-net:
external: trueBefore starting the containers, replace:
choose_a_db_passwordchoose_an_admin_passwordyour_generated_secret_key_here
with your own values.
The PostgreSQL password must match in both the PostgreSQL container and the Paperless configuration.
Why these containers are needed
Paperless-ngx is more than a single container.
Container | Function |
|---|---|
| Main Paperless application |
| PostgreSQL database |
| Background task queue |
| Text and document extraction |
| Office/document conversion |
This is why the initial startup can take several minutes.
A note about Apache Tika
One of the lessons from this installation is particularly worth documenting.
The old image:
ghcr.io/paperless-ngx/tikais no longer publicly accessible.
The Compose configuration therefore uses:
image: docker.io/apache/tika:latestDon’t substitute the old Paperless Tika image from an older installation guide.
Use the Apache Tika image shown in the Compose file above.
Connect Paperless to the Internet — safely
Stage 4 — Add the DNS record
In Cloudflare, create:
Type | Name | Content | Proxy |
|---|---|---|---|
A |
| Your public IP | Grey cloud — DNS only |
This creates:
docs.plainshawk.co.ukAlthough the hostname is publicly resolvable, the Paperless web application itself will be protected by the Nginx Proxy Manager access rules configured later.
A person outside your home network should receive a 403 Forbidden response.
That is intentional.
Stage 5 — Start Paperless-ngx
Start the complete stack:
docker compose up -dThen follow the Paperless logs:
docker compose logs -f paperlessThe first startup can take 2–3 minutes.
Wait until Paperless reports that it is ready before continuing.
Press Ctrl+C once it is running.
Then check all five containers:
docker compose psYou should see:
paperlesspaperless-dbpaperless-redispaperless-gotenbergpaperless-tika
running.
Configure Nginx Proxy Manager
Stage 6 — Add the Proxy Host
Log into Nginx Proxy Manager.
Go to:
Proxy Hosts → Add Proxy Host
Details
Field | Value |
|---|---|
Domain |
|
Scheme |
|
Forward Hostname |
|
Forward Port |
|
Cache Assets | Off |
Block Common Exploits | On |
Websockets Support | On |
SSL
On the SSL tab:
- Request a new Let’s Encrypt certificate
- Force SSL: On
- HTTP/2 Support: On
Restrict Paperless to the home network
This is the most important part of the Nginx configuration.
Open the Advanced tab and add:
# Home network restriction
# 192.168.178.0/24 = your home LAN
# 192.168.65.0/24  = Docker Desktop VM gateway (required on macOS)
# 172.16.0.0/12    = Docker internal networks

allow 192.168.178.0/24;
allow 192.168.65.0/24;
allow 172.16.0.0/12;
allow 10.0.0.0/8;
allow 127.0.0.1;
deny all;

# Upload size for large PDFs and scanned documents
client_max_body_size 100M;

proxy_read_timeout 300s;
proxy_send_timeout 300s;
proxy_buffering off;

# Block scanners — Paperless uses Python, no PHP
location ~ \.(php|php\d|phtml|asp|aspx|cgi)$ {
    return 444;
}

location ~ /(wp-admin|wp-login|wp-content|wp-includes|xmlrpc\.php) {
    return 444;
}

location ~ /\.(env|git|svn|aws|ssh|npmrc) {
    return 444;
}

location ~ /(phpmyadmin|pma|adminer|mysql)/ {
    return 444;
}

location ~ /(shell|cmd|exec|system|passthru|eval)/ {
    return 444;
}
Save the Proxy Host.
192.168.65.0/24allowed?Docker Desktop on macOS runs containers inside a lightweight Linux VM.
As a result, traffic reaching Nginx Proxy Manager from the Docker environment can appear to originate from the Docker Desktop VM network rather than your normal home LAN.
For this installation, 192.168.65.0/24 therefore needs to be explicitly allowed.
The example above assumes:
192.168.178.0/24If your router uses a different subnet, change this rule accordingly.
On the Mac, check your current address with:
ipconfig getifaddr en0For example, if the Mac reports:
192.168.178.42then 192.168.178.0/24 is the appropriate LAN rule.
First login
Stage 7 — Log in and verify
Open:
https://docs.plainshawk.co.uk
Log in using the values specified by:
PAPERLESS_ADMIN_USERPAPERLESS_ADMIN_PASSWORD
You should see the Paperless dashboard.
Go to:
Administration → Tasks
The system should be idle and healthy.
Configure Paperless
Stage 8 — Configure settings
Open Settings in the Paperless interface.
General
Configure:
Setting | Value |
|---|---|
Application title | Plainshawk Documents |
Default language | English |
Basic metrics | On |
Basic metrics are useful for monitoring the installation.
Document Processing
Set:
Setting | Value |
|---|---|
Default OCR language | English |
Archive file override | Skip |
The archive setting corresponds with:
PAPERLESS_OCR_SKIP_ARCHIVE_FILE=with_textNotifications
Configure your email address for system notifications.
These will be sent through the internal Mailrelay container.
Organise your document library
Stage 9 — Create correspondents, tags and document types
I recommend setting up the basic classification structure before importing your existing document collection.
This allows Paperless’s automatic matching to start working immediately.
Correspondents
Go to:
Correspondents → Add
Create correspondents for organisations such as:
Correspondent |
|---|
HMRC |
Your bank(s) |
Utility providers |
Insurance companies |
NHS / GP |
Mortgage lender / landlord |
Document Types
Go to:
Document Types → Add
Suggested types:
Document Type |
|---|
Invoice |
Statement |
Letter |
Contract |
Receipt |
Tax Return |
Policy |
Tags
Go to:
Tags → Add
Suggested tags:
Tag |
|---|
Important |
Action Required |
Archive |
Personal |
Financial |
Medical |
Property |
Automatic matching
Paperless can automatically assign correspondents and tags based on document contents.
For example:
Correspondent | Algorithm | Pattern |
|---|---|---|
HMRC | Any word |
|
Your bank | Any word | Your bank name |
Start with simple rules and refine them as you learn how your documents are being classified.
Test document ingestion
Stage 10 — Test the consume folder
The easiest way to add documents to Paperless is to place them in the consume directory.
For a quick test, copy a PDF into it:
cp any_document.pdf /Volumes/Media-Home/paperless/consume/Paperless should automatically detect the file and process it.
You can watch the logs with:
docker compose logs -f paperless | grep -i consumeWithin approximately 30–60 seconds, the document should appear in the Paperless interface with OCR text extracted.
Rather than opening Paperless every time you want to add a document, you can simply drag files into the consume folder.
Paperless takes care of:
- Detecting the document
- Processing it
- Performing OCR where necessary
- Extracting metadata
- Storing the processed document
- Making it searchable
Stage 11 — Add the consume folder to Finder
Make the consume folder easily accessible from anywhere on the Mac.
In Finder:
- Press Cmd+Shift+G
- Enter:
/Volumes/Media-Home/paperless/consume- Press Return
- Drag the resulting folder into the Finder sidebar
You can now drag documents directly into the Paperless consume folder.
Backups
Stage 12 — Add Paperless to the backup script
Paperless contains information that would be extremely difficult to replace, so backups are particularly important.
Open your backup script:
nano ~/docker/backups/backup.shConfirm that the PostgreSQL database backup is present:
# Paperless-NGX database
docker exec paperless-db pg_dump \
  -U paperless \
  paperless > $BACKUP_DIR/paperless_$DATE.sql

echo "Paperless backup done"
Back up the processed documents
The database alone isn’t enough.
The actual processed documents are stored in the media directory, so back those up too:
# Paperless media (processed documents)
rsync -a \
  /Volumes/Media-Home/paperless/media/ \
  $BACKUP_DIR/paperless-media-$DATE/

echo "Paperless media backup done"Your Paperless database contains metadata, indexing information and document relationships.
The media directory contains the processed documents themselves.
Back up both.
As the document collection grows, the media backup will also grow. Once the library becomes substantial, consider including the Paperless media directory in your Time Machine backup scope rather than copying a complete additional version every night.
Automatic startup and monitoring
Stage 13 — Add Paperless to the startup script
Open the startup script:
nano ~/docker/start-all.shConfirm that Paperless is started before Nginx Proxy Manager:
echo "Starting Paperless-NGX..."
cd /Users/gavin/docker/paperless && docker compose up -d
Paperless needs to be available on proxy-net before Nginx Proxy Manager attempts to connect to it.
Stage 14 — Add Paperless to Uptime Kuma
Open:
https://status.plainshawk.co.uk
Add a new monitor:
Field | Value |
|---|---|
Name | Paperless-NGX |
Monitor Type | HTTP(s) |
URL |
|
Heartbeat Interval | 60s |
Retries | 3 |
Paperless is deliberately restricted by the Nginx Proxy Manager access list.
Uptime Kuma can bypass that restriction by connecting directly to:
http://paperless:8000from inside the Docker environment.
This is intentional and means Uptime Kuma can monitor Paperless without making the Paperless web interface publicly accessible.
Quick reference
Location | Purpose |
|---|---|
| Paperless web interface |
| Drop documents here |
| Processed documents |
| Application/search data |
| Paperless exports |
| PostgreSQL database |
Updating Paperless
Paperless-ngx is containerised, so updating it is straightforward.
First change to the application directory:
cd ~/docker/paperlessPull the latest images:
docker compose pullThen recreate the containers:
docker compose down
docker compose up -d
Finally, monitor the startup:
docker compose logs -f paperlessPaperless performs database migrations automatically when required.
Before updating
Because Paperless contains important documents, I recommend taking a current database and media backup before performing an update.
Also check the Paperless-ngx release notes before moving to a new version, particularly if you are jumping across major versions.
Troubleshooting
403 Forbidden from outside the home network
This is working as intended.
The Nginx Proxy Manager access list only permits the configured home network and the Docker networks.
An external connection should be rejected.
403 Forbidden from inside the home network
Your home LAN may use a different subnet from the example:
192.168.178.0/24Check your Mac’s address:
ipconfig getifaddr en0Then adjust the Nginx Proxy Manager allow rule to match your actual LAN.
Documents are stuck in the consume folder
Check the Paperless logs:
docker compose logs --tail=30 paperless | grep -i errorAlso check that the Paperless container can see the consume directory and that Docker Desktop has access to /Volumes/Media-Home.
Tika isn’t processing Office documents
First check that the container is running:
docker compose ps paperless-tikaIt should be listed as running.
Also confirm that the Compose file contains:
image: docker.io/apache/tika:latestrather than the obsolete Paperless-specific Tika image.
Search returns no results
The search index can be rebuilt with:
docker exec paperless python3 manage.py document_index reindexDepending on the size of the library, rebuilding the index can take some time.
OCR quality is poor
OCR quality depends heavily on the quality of the original scan.
For best results:
- Scan at 300 DPI or higher
- Use clean, high-contrast documents
- Avoid heavily compressed images
- Keep pages straight when scanning
Paperless can perform very well with clean source documents, but it can’t recover information that isn’t present clearly in the scan.
502 Bad Gateway on first access
Paperless takes longer to start than some of the simpler services running on the Mac Mini.
On the first startup, allow approximately three minutes before assuming something is wrong.
Check:
docker compose psand:
docker compose logs --tail=50 paperlessIf Paperless eventually reports that it is ready, retry the web interface.
Final security and backup checklist
- Docker Desktop is running
proxy-netexists- PostgreSQL is running and healthy
- Redis is running and healthy
- Tika is running
- Gotenberg is running
- Paperless is running
- Paperless data is stored on
/Volumes/Media-Home - The PostgreSQL database has a persistent volume
- The Paperless media directory is backed up
- The database is included in the nightly backup
docs.plainshawk.co.ukresolves correctly- HTTPS works through Nginx Proxy Manager
- Access from the home network works
- Access from outside the home network is rejected
- The
consumefolder works - OCR has been tested
- Email notifications have been tested
- Uptime Kuma is monitoring Paperless
- Paperless is included in the startup script
Conclusion
Paperless-ngx is now running as a persistent Docker service on the Mac Mini, with PostgreSQL providing the database and the document library stored safely on the external SSD.
The installation is deliberately more restrictive than a typical self-hosted web application. Paperless isn’t intended to be a public service: Nginx Proxy Manager provides HTTPS access while its access list limits the application to the home network.
The combination of persistent storage, database backups, media backups, automatic startup and Uptime Kuma monitoring means that Paperless is not just running — it is integrated into the wider Plainshawk home server environment.
And, perhaps most importantly, adding a document to the system is now as simple as dragging it into the Paperless consume folder in Finder.