
Setting up a Home Inventory under Docker

Installing, Securing and Updating Homebox
Mac Mini · Docker · Nginx Proxy Manager
Homebox is a self-hosted inventory application for keeping track of the things you own, where they are stored, and useful information about them.
This guide installs Homebox on a Mac Mini using Docker, stores its data on an external drive, places it behind Nginx Proxy Manager (NPM), restricts access to the home network, and configures it for reliable backups and controlled updates.
What This Guide Gets Right
There are a few details about Homebox that are easy to overlook. These are particularly important in this installation.
HBOX_AUTH_API_KEY_PEPPERis required and must be at least 32 characters long.HBOX_OPTIONS_CURRENCY=GBPshould be set as an environment variable; relying on the UI setting alone does not reliably persist it.User registration should be enabled only while creating your initial accounts, then disabled.Use the rootless Homebox image rather than the standard image.Pin Homebox to a specific release rather than relying onlatest, so updates are deliberate and predictable.Homebox stores its data in SQLite, so there is no separate database container.The./datadirectory contains the Homebox database and application data and can be backed up with a simple directory copy.Always back up before upgrading. Homebox database schema changes can make reverting to an earlier version unsafe.
Architecture
The installation is deliberately simple:
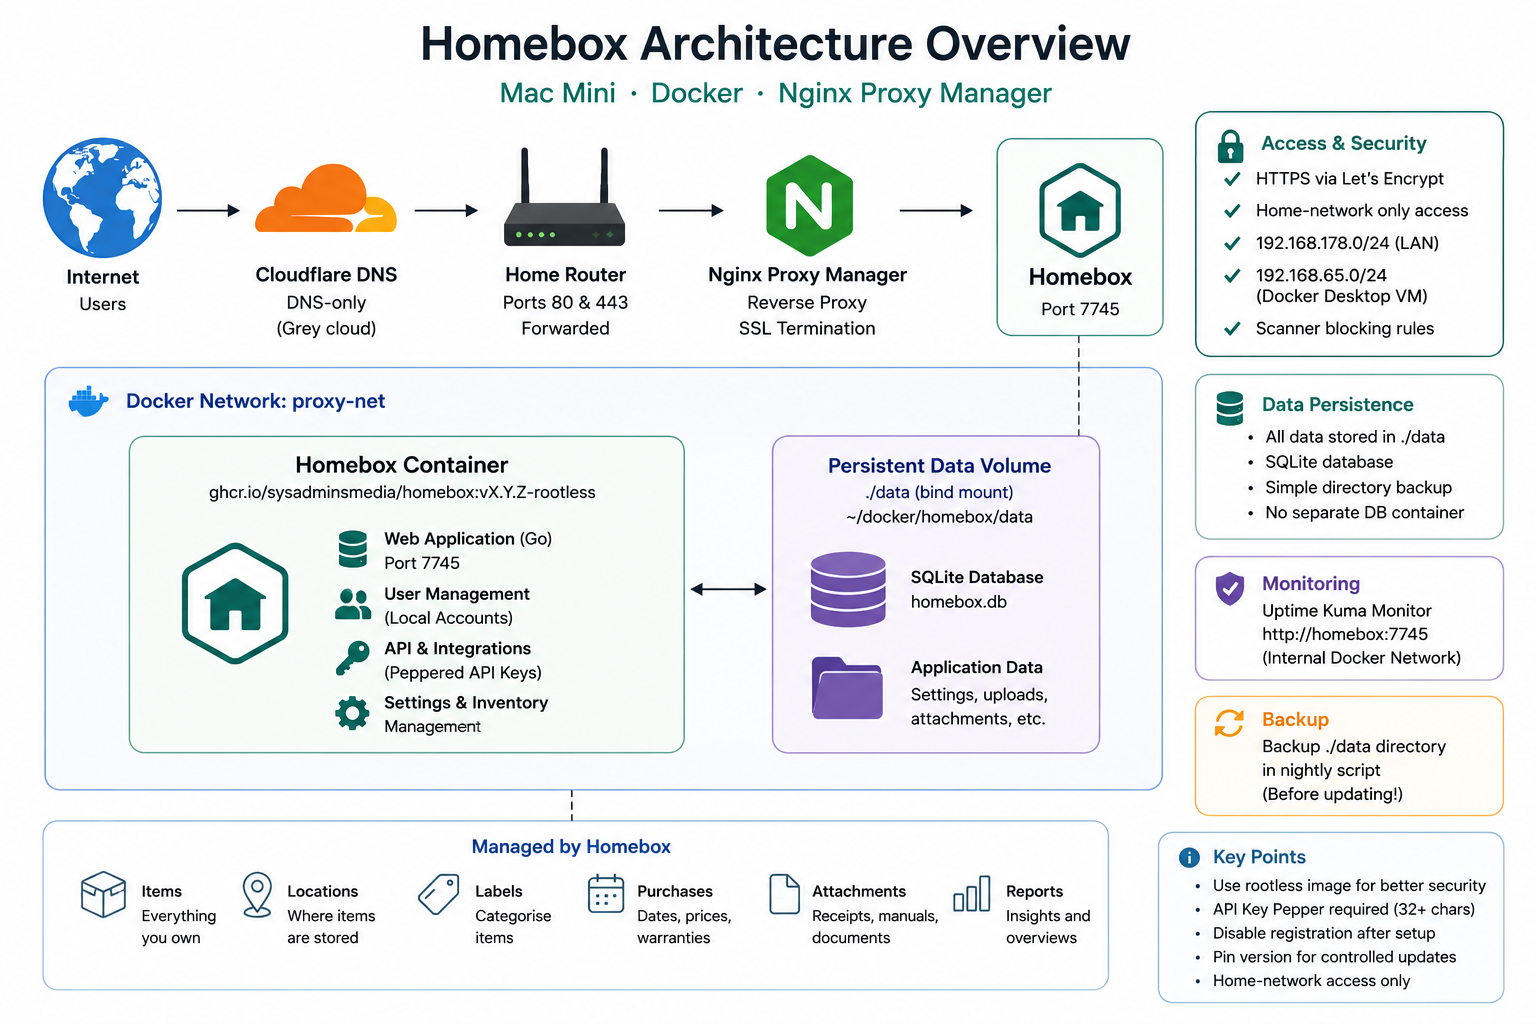
The Homebox container is connected directly to the existing proxy-net Docker network. NPM therefore reaches it using the Docker hostname homebox, without exposing port 7745 directly to the Mac or the Internet.
Prerequisites
Before starting, make sure you have:
- Docker Desktop running
- The
proxy-netDocker network already created - Ports 80 and 443 forwarded from your router
- A Cloudflare DNS record for
homebox.plainshawk.co.uk - The Cloudflare record set to DNS only — grey cloud
- Nginx Proxy Manager running
- Uptime Kuma running, if you intend to monitor Homebox
- A backup location available for your Docker data
The Homebox installation does not require a separate database container.
Stage 1 — Create the Directory Structure
Create the Docker directory:
mkdir -p ~/docker/homebox
cd ~/docker/homebox
Homebox will store its database and application data in:
~/docker/homebox/data
We deliberately keep the Homebox data directory alongside the Docker configuration rather than placing it on the Mac's system SSD elsewhere.
Stage 2 — Generate the API Key Pepper
Homebox requires an API key pepper for securing API keys.
Generate a cryptographically random value:
openssl rand -base64 48 > ~/docker/homebox/hbox.pepper
Protect the file:
chmod 400 ~/docker/homebox/hbox.pepper
Display the generated value:
cat ~/docker/homebox/hbox.pepper
Copy the output.
You will put this value into the Docker Compose file in the next stage.
Store a copy of the pepper in Vaultwarden.
Do not regenerate it casually after Homebox has been configured. Existing API keys depend on this value, so changing it can invalidate them.
Stage 3 — Check the Current Homebox Release
Do not blindly use the latest tag.
The latest tag does not necessarily move immediately when a new Homebox release is published. Pinning a specific release gives you much better control over upgrades.
Check the current stable release:
curl -s https://api.github.com/repos/sysadminsmedia/homebox/releases/latest \
  | grep '"tag_name"'
You should get output similar to:
"tag_name": "v0.25.0",
Make a note of the version.
In the compose file below, replace v0.25.0 with whatever current release you found.
Homebox database schema changes may prevent you from safely returning to an older version after an upgrade.
Always create a backup before changing the Homebox version.
Stage 4 — Create the Docker Compose File
Create the compose file:
nano docker-compose.yml
Paste the following:
services:
  homebox:
    image: ghcr.io/sysadminsmedia/homebox:v0.25.0-rootless
    container_name: homebox
    restart: unless-stopped
    environment:
      - TZ=Europe/London
      - HBOX_LOG_LEVEL=info
      - HBOX_LOG_FORMAT=text
      - HBOX_WEB_MAX_UPLOAD_SIZE=10
      - HBOX_OPTIONS_CURRENCY=GBP
      - HBOX_OPTIONS_ALLOW_REGISTRATION=true
      - HBOX_AUTH_API_KEY_PEPPER=paste_your_pepper_here
    volumes:
      - ./data:/data
    healthcheck:
      test: ["CMD", "curl", "-f", "http://localhost:7745/api/v1/status"]
      interval: 30s
      timeout: 5s
      retries: 3
      start_period: 10s
    networks:
      - proxy-net

networks:
  proxy-net:
    external: true
There are several deliberate choices here.
Rootless image
We use:
image: ghcr.io/sysadminsmedia/homebox:v0.25.0-rootless
rather than the standard image.
The rootless variant runs Homebox without requiring the application to run as root.
Persistent data
Homebox uses SQLite, so its important data is stored in:
./data
which corresponds to:
~/docker/homebox/data
on the Mac.
Currency
The currency is explicitly set with:
- HBOX_OPTIONS_CURRENCY=GBP
This is preferable to relying solely on the corresponding setting in the web interface.
Registration
For the initial installation we use:
- HBOX_OPTIONS_ALLOW_REGISTRATION=true
This allows you to create your accounts.
Do not leave registration enabled permanently. It will be disabled later in the guide.
API key pepper
Replace:
- HBOX_AUTH_API_KEY_PEPPER=paste_your_pepper_here
with the value generated in Stage 2.
Version pinning
Replace:
v0.25.0
with the release version identified in Stage 3.
For example:
image: ghcr.io/sysadminsmedia/homebox:v0.25.0-rootless
latest for this installationPinning a version means you know exactly which Homebox release you are running.
It also means an update cannot happen unexpectedly simply because the latest image changes.
Stage 5 — Add the DNS Record
In Cloudflare, create an A record for Homebox.
| Type | Name | Content | Proxy |
|---|---|---|---|
| A | homebox |
Your public IP address | DNS only / grey cloud |
The resulting hostname will be:
homebox.plainshawk.co.uk
The grey cloud is important because Nginx Proxy Manager is handling HTTPS and the Let's Encrypt certificate.
Stage 6 — Start Homebox
Start the container:
docker compose up -d
Watch the logs:
docker compose logs -f homebox
Homebox should start within a few seconds.
Once it is running, press Ctrl+C to stop following the logs. This does not stop Homebox.
Check the container:
docker compose ps
You should see the Homebox container running.
You can also check its health:
docker inspect --format='{{.State.Health.Status}}' homebox
Once everything is working, this should report:
healthy
Stage 7 — Add the Proxy Host in Nginx Proxy Manager
Log into Nginx Proxy Manager and go to:
Proxy Hosts → Add Proxy Host
Details
Enter:
| Field | Value |
|---|---|
| Domain Names | homebox.plainshawk.co.uk |
| Scheme | http |
| Forward Hostname | homebox |
| Forward Port | 7745 |
| Cache Assets | Off |
| Block Common Exploits | On |
| Websockets Support | On |
Homebox does not need to expose port 7745 directly on the Mac.
NPM reaches it through Docker's proxy-net network using the hostname homebox.
SSL
On the SSL tab:
- Request a new Let's Encrypt certificate
- Force SSL: On
- HTTP/2 Support: On
Save the proxy host.
Stage 8 — Restrict Homebox to Your Home Network
Homebox contains information about your possessions and their locations, so there is little reason for its interface to be publicly accessible.
Open the Advanced tab of the Homebox proxy host and add:
# Home network restriction
# 192.168.178.0/24 = home LAN
# 192.168.65.0/24  = Docker Desktop VM gateway on macOS
# 172.16.0.0/12    = Docker internal networks

allow 192.168.178.0/24;
allow 192.168.65.0/24;
allow 172.16.0.0/12;
allow 10.0.0.0/8;
allow 127.0.0.1;
deny all;

# Upload size
client_max_body_size 10M;

# Timeouts
proxy_read_timeout 300s;
proxy_send_timeout 300s;
proxy_buffering off;

# Block common automated scanners
# Homebox uses Go, not PHP

location ~ \.(php|php\d|phtml|asp|aspx|cgi)$ {
    return 444;
}

location ~ /(wp-admin|wp-login|wp-content|wp-includes|xmlrpc\.php) {
    return 444;
}

location ~ /\.(env|git|svn|aws|ssh|npmrc) {
    return 444;
}

location ~ /(phpmyadmin|pma|adminer|mysql)/ {
    return 444;
}

location ~ /(shell|cmd|exec|system|passthru|eval)/ {
    return 444;
}
Save the proxy host.
192.168.65.0/24 allowed?Docker Desktop on macOS runs containers inside a lightweight Linux VM.
As a result, traffic arriving through Nginx Proxy Manager may appear to originate from Docker Desktop's VM gateway rather than directly from your Mac's LAN address.
Without this rule, you can find yourself receiving a 403 Forbidden even though you are sitting on your own home network.
Stage 9 — Create Your Homebox Accounts
Now visit:
https://homebox.plainshawk.co.uk
Because registration is temporarily enabled, you should see the registration page.
Create your account.
If you want another household member to have their own account, create that account as well.
Once all required accounts exist, disable registration immediately.
Edit the compose file:
nano ~/docker/homebox/docker-compose.yml
Change:
- HBOX_OPTIONS_ALLOW_REGISTRATION=true
to:
- HBOX_OPTIONS_ALLOW_REGISTRATION=false
Save the file and recreate the container:
docker compose up -d
Confirm that Homebox is still running:
docker compose ps
Leaving registration enabled allows anybody who can reach the Homebox registration page to attempt to create an account.
For a private household inventory, there is normally no reason to leave it enabled.
Stage 10 — Configure Homebox
Log into Homebox and open:
Profile → Settings
Group settings
Set:
- Home/group name: for example,
Plainshawk Home - Currency: GBP
- Timezone: Europe/London
The GBP setting should already be supplied by:
HBOX_OPTIONS_CURRENCY=GBP
The environment variable is intentionally retained even if the UI also shows GBP.
Create Your Locations
It is worth creating your location hierarchy before adding lots of inventory.
For example:
Ground Floor
├── Kitchen
├── Living Room
└── Study

First Floor
├── Main Bedroom
└── Spare Room

Garage
Garden
Loft
You can then assign items to meaningful locations rather than trying to reorganise them later.
Stage 11 — Add to the Startup Script
Homebox should start automatically when your Docker services are brought up.
Edit:
nano ~/docker/start-all.sh
Make sure the Homebox section is present before the NPM startup line:
echo "Starting Homebox..."
cd /Users/gavin/docker/homebox && docker compose up -d
Save the file.
Stage 12 — Add Homebox to Uptime Kuma
Open your Uptime Kuma installation:
https://status.plainshawk.co.uk
Add a new monitor.
| Field | Value |
|---|---|
| Name | Homebox |
| Monitor Type | HTTP(s) |
| URL | http://homebox:7745 |
| Heartbeat Interval | 60 seconds |
Using the Docker hostname means Uptime Kuma monitors Homebox directly over the Docker network rather than going through Cloudflare and NPM.
Stage 13 — Back Up Homebox
Homebox uses SQLite, so there is no separate database container to dump.
The important data is contained in:
~/docker/homebox/data
Edit your nightly backup script:
nano ~/docker/backups/backup.sh
Add:
# Homebox
cp -r ~/docker/homebox/data \
  $BACKUP_DIR/homebox_$DATE
echo "Homebox backup done"
This gives you a complete copy of the Homebox database and associated application data.
Homebox database migrations can make an older version incompatible with the upgraded database.
Your backup is therefore particularly important before changing the image version.
Updating Homebox
Homebox should be updated deliberately rather than simply pulling latest.
The recommended workflow is:
- Back up the existing data.
- Read the release notes.
- Change the pinned image version.
- Pull the new image.
- Recreate the container.
- Check the logs.
- Verify that your inventory is intact.
Step 1 — Back up the current installation
cd ~/docker/homebox

cp -r ./data \
  ~/docker/backups/homebox_preupdate_$(date +%Y%m%d_%H%M%S)
Confirm that the backup exists before proceeding.
Step 2 — Check the release notes
Before upgrading, check the Homebox changelog and release information.
Look specifically for:
- Database migrations
- Breaking changes
- Configuration changes
- Required manual migration steps
- Security fixes
Homebox changes can include database schema migrations. A newer version may not be safely reversible once the migration has taken place.
Step 3 — Change the image version
Edit the compose file:
nano docker-compose.yml
For example, change:
image: ghcr.io/sysadminsmedia/homebox:v0.25.0-rootless
to the new release:
image: ghcr.io/sysadminsmedia/homebox:vX.Y.Z-rootless
Save the file.
Step 4 — Pull and recreate
Pull the new image:
docker compose pull
Then recreate the container:
docker compose up -d --force-recreate
Watch the startup:
docker compose logs -f homebox
Look for startup errors or migration problems.
Step 5 — Verify the installation
Check the container:
docker compose ps
Then open:
https://homebox.plainshawk.co.uk
Verify that:
- You can log in
- Your inventory is present
- Locations are intact
- Images are present
- The currency is still GBP
- Any API integrations still work
Only consider the update complete once these checks have passed.
A pinned version makes the installed software predictable.
You can see exactly which release is running, choose when to upgrade, and create a known-good backup before each migration.
Quick Reference
| URL / Path | Purpose |
|---|---|
https://homebox.plainshawk.co.uk |
Homebox web interface |
~/docker/homebox |
Docker Compose configuration |
~/docker/homebox/data |
Homebox database and application data |
https://status.plainshawk.co.uk |
Uptime Kuma monitoring |
Troubleshooting
Currency still shows USD
Check that the environment variable is present inside the container:
docker exec homebox env | grep CURRENCY
You should see:
HBOX_OPTIONS_CURRENCY=GBP
If it is missing, check the compose file and recreate the container:
docker compose up -d --force-recreate
Registration page does not appear
Check:
HBOX_OPTIONS_ALLOW_REGISTRATION=true
If it is currently false, temporarily change it to true and recreate the container:
docker compose up -d
Create the required account(s), then change it back to:
HBOX_OPTIONS_ALLOW_REGISTRATION=false
and recreate the container again.
403 Forbidden from inside the home network
The NPM access list is probably blocking the address that Docker Desktop presents to NPM.
First check the NPM logs:
docker exec nginx-proxy-manager \
  tail -20 /data/logs/proxy-host-*_error.log
Also check your Mac's LAN address:
ipconfig getifaddr en0
Your home subnet may not actually be 192.168.178.0/24.
If your router uses a different subnet, change the corresponding allow rule in the NPM Advanced configuration.
The Docker Desktop VM gateway range:
192.168.65.0/24
should normally remain present on macOS.
API keys stop working after an update
Check that the API key pepper has not changed.
Inspect the running container:
docker exec homebox env | grep HBOX_AUTH_API_KEY_PEPPER
If the pepper has been changed, existing API keys may no longer work.
Do not generate a new pepper simply to troubleshoot an unrelated problem.
Data is missing after an update
First check that the data directory is mounted:
docker exec homebox ls -la /data
You should see the Homebox database and associated files.
Then check the Docker volume configuration:
docker inspect homebox --format='{{json .Mounts}}'
The host directory should correspond to:
~/docker/homebox/data
Container will not start after a version change
Check the logs:
docker compose logs --tail=100 homebox
Look for database migration or configuration errors.
Do not immediately delete the data directory.
If the new release is incompatible with the existing database, restore the pre-update backup and investigate the release notes before attempting another upgrade.
Homebox is running but cannot be reached through NPM
Check that both containers are connected to proxy-net:
docker network inspect proxy-net
You should see both:
homebox
nginx-proxy-manager
If Homebox is missing, reconnect it:
docker network connect proxy-net homebox
Then test the Homebox container directly:
docker exec homebox curl -f http://localhost:7745/api/v1/status
Final Checklist
Before considering the installation complete, verify all of the following:
- [ ] Homebox is running the rootless image
- [ ] The image is pinned to a specific version
- [ ]
HBOX_AUTH_API_KEY_PEPPERis configured - [ ] The pepper has been stored safely in Vaultwarden
- [ ]
HBOX_OPTIONS_CURRENCY=GBPis configured - [ ] Initial user accounts have been created
- [ ]
HBOX_OPTIONS_ALLOW_REGISTRATION=false - [ ] Homebox is connected to
proxy-net - [ ] NPM provides HTTPS
- [ ] NPM restricts access to the home network
- [ ]
192.168.65.0/24is allowed for Docker Desktop on macOS - [ ] Common scanner requests are blocked
- [ ] Homebox is monitored by Uptime Kuma
- [ ] Homebox data is included in the nightly backup
- [ ] A pre-update backup is taken before every version upgrade
- [ ] The Homebox release notes are checked before upgrading
With those measures in place, Homebox is a relatively simple service to maintain: one container, one SQLite data directory, no exposed application port, and a straightforward backup and upgrade procedure.