
Setting up a Password Store under Docker

Installing, Securing and Updating Vaultwarden
Mac Mini · Docker · Nginx Proxy Manager · Mailrelay
Vaultwarden is a lightweight, self-hosted implementation of the Bitwarden server API. It allows the official Bitwarden desktop, browser and mobile applications to use your own password vault rather than Bitwarden's hosted infrastructure.
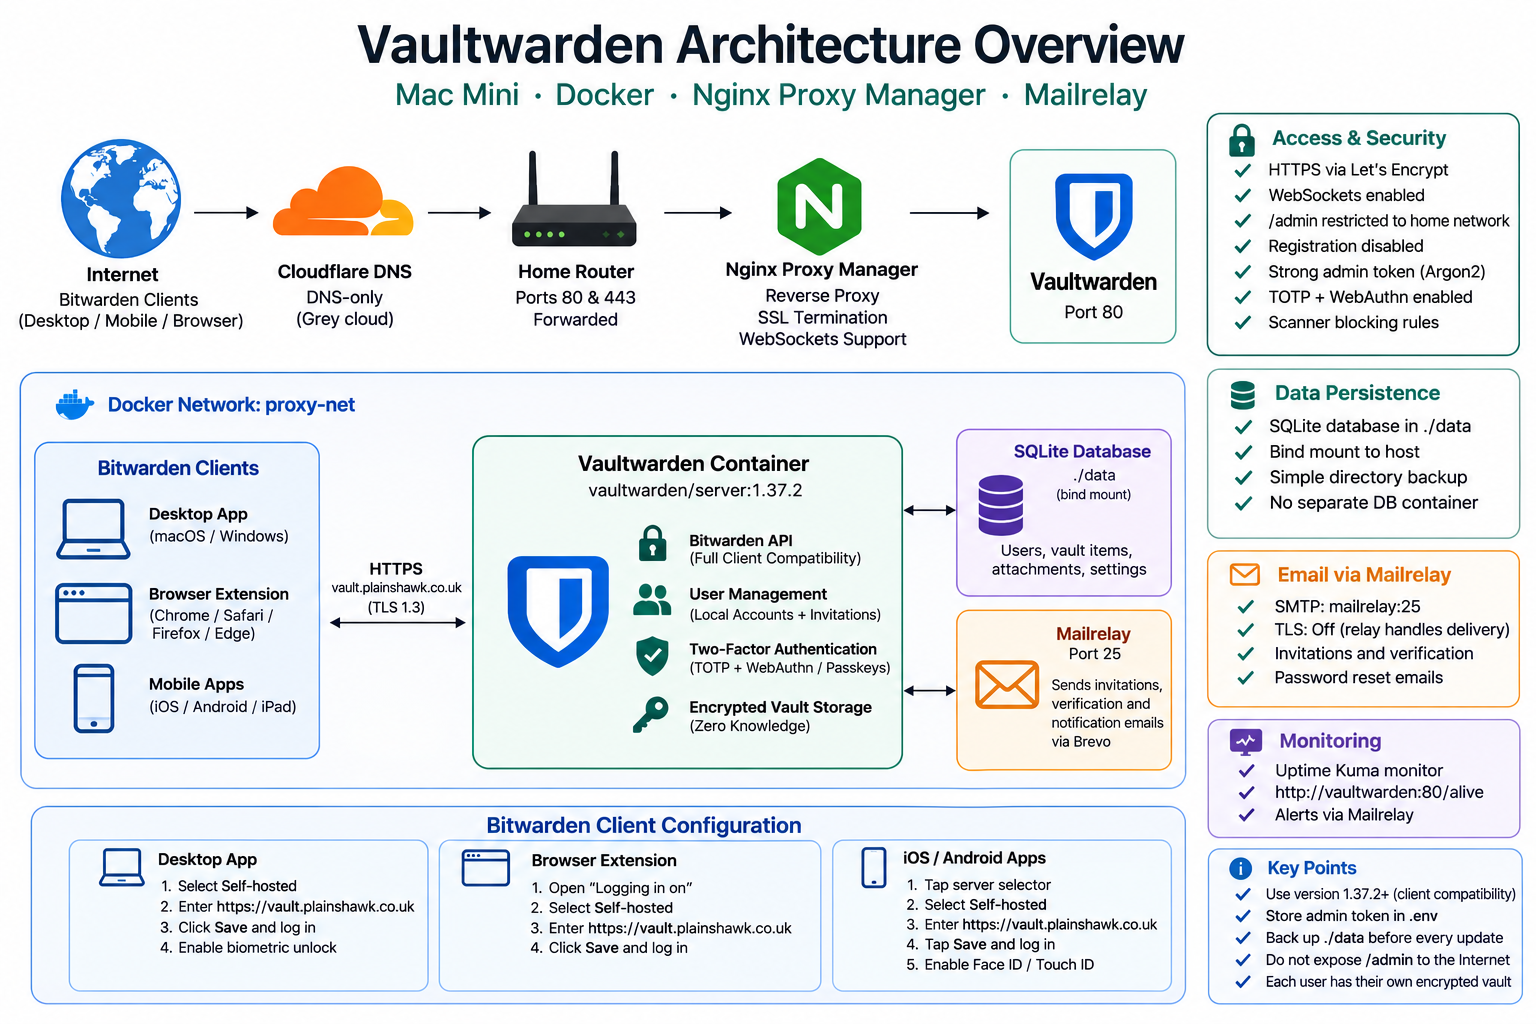
This guide installs Vaultwarden on a Mac Mini using Docker, publishes it securely through Nginx Proxy Manager (NPM), sends email through the existing Mailrelay container, and configures the official Bitwarden clients to use the self-hosted server.
Important version note — August 2026: This guide uses Vaultwarden 1.37.2. Vaultwarden 1.37.2 is required for compatibility with Bitwarden clients 2026.8.0 and newer. Do not deploy 1.37.1 if you intend to use the current Bitwarden clients.
What this guide covers
By the end of the installation you will have:
- Vaultwarden running in Docker
- Persistent SQLite data stored under
~/docker/vaultwarden/data - HTTPS provided by Nginx Proxy Manager and Let's Encrypt
- The Vaultwarden administration interface restricted to the home network
- New-user registration disabled
- Two-factor authentication enabled
- WebAuthn/passkey authentication configured
- Email delivered through the existing Mailrelay container
- Official Bitwarden desktop, browser and mobile clients connected to Vaultwarden
- Vaultwarden included in the nightly backup
- Vaultwarden included in the Docker startup sequence
- Vaultwarden monitored by Uptime Kuma
- A controlled update and recovery procedure
Key Lessons Incorporated From Your Setup
There are several details worth getting right because Vaultwarden is much more security-sensitive than most of the other services on this Mac Mini.
- Keep the Vaultwarden data directory persistent. The database and cryptographic material are stored under
./data. - Keep the admin token out of
docker-compose.yml. Store it separately in.env. - Prefer an Argon2 admin-token hash. Vaultwarden explicitly recommends an Argon2 PHC string rather than a plain-text token.
- Disable registration after creating your accounts. Leaving registration enabled would allow anyone who discovers the URL to attempt to create an account.
- Restrict
/adminto your home network. The administration interface should never be unnecessarily exposed to the Internet. - Use HTTPS. The Bitwarden web vault and client ecosystem depend on a secure HTTPS environment.
- Keep WebSockets enabled. They are required for reliable client synchronisation and notifications through the reverse proxy.
- Back up the entire
datadirectory. This contains the SQLite database, cryptographic keys and other Vaultwarden state. - Back up before every upgrade. Vaultwarden contains your password database; recovery should be possible before changing the software.
- Keep Vaultwarden and the Bitwarden clients compatible. Vaultwarden 1.37.2 is required for Bitwarden clients 2026.8.0 and newer. (GitHub)
Prerequisites
Before starting, confirm that you have:
- Docker Desktop running
- The
proxy-netDocker network already created - The Mailrelay container running
- Ports 80 and 443 forwarded on your router
- A Cloudflare A record for
vault.plainshawk.co.uk - The Cloudflare record configured as DNS only / grey cloud
- Nginx Proxy Manager running
- Uptime Kuma running
- Vaultwarden's future admin token stored somewhere secure
Stage 1 — Create the Directory Structure
Create the Docker directory:
mkdir -p ~/docker/vaultwarden
cd ~/docker/vaultwarden
The resulting structure will be:
~/docker/vaultwarden/
├── .env
├── docker-compose.yml
└── data/
The data directory will be created automatically by Docker when Vaultwarden starts.
Stage 2 — Generate the Admin Token
The Vaultwarden admin token protects the /admin administration interface.
Generate a strong random token:
openssl rand -base64 48
Copy the resulting value.
Store it temporarily somewhere secure while completing the installation.
Argon2 option
Vaultwarden recommends using an Argon2 PHC hash rather than storing the admin password in plain text. The Vaultwarden container includes a hash command:
docker run --rm -it vaultwarden/server:1.37.2 /vaultwarden hash
Follow the prompts and enter the password you want to use when logging into /admin.
The command produces a value beginning approximately:
$argon2id$v=19$...
If you use the Argon2 form, take particular care with the $ characters because Docker Compose performs variable interpolation.
For this installation, a strong random plain token stored in a protected .env file is also workable for a small home server, but Vaultwarden will warn that it is a less secure configuration.
Stage 3 — Create the .env File
Keeping the admin token outside the Compose file makes it much easier to protect the secret from accidental disclosure.
Create the file:
nano .env
Add:
ADMIN_TOKEN=paste_your_admin_token_here
If you are using an Argon2 PHC string, follow Vaultwarden's escaping requirements carefully. Do not simply paste a $argon2id$... value into Compose without checking how Docker Compose will interpret the $ characters.
Protect the file:
chmod 600 .env
Check:
ls -l .env
It should only be readable by your user.
.env file contains a credential that can access the Vaultwarden administration interface. Do not put it into Git, upload it to cloud storage, or include it in screenshots or blog posts.Stage 4 — Create the Compose File
Create the Compose file:
nano docker-compose.yml
Use:
services:
  vaultwarden:
    image: vaultwarden/server:1.37.2
    container_name: vaultwarden
    restart: unless-stopped

    environment:
      # Core settings
      - DOMAIN=https://vault.plainshawk.co.uk
      - ADMIN_TOKEN=${ADMIN_TOKEN}

      # Registration
      # Enable temporarily during first-run account creation.
      - SIGNUPS_ALLOWED=true
      - INVITATIONS_ALLOWED=true
      - SHOW_PASSWORD_HINT=false

      # Logging
      - LOG_LEVEL=warn
      - EXTENDED_LOGGING=true

      # Email via Mailrelay
      - SMTP_HOST=mailrelay
      - SMTP_PORT=25
      - SMTP_SECURITY=off
      - SMTP_FROM=vault@plainshawk.co.uk
      - SMTP_FROM_NAME=Vaultwarden

      # Security
      - DISABLE_ICON_DOWNLOAD=false
      - ICON_CACHE_TTL=2592000
      - ICON_CACHE_NEGTTL=259200

      # Two-factor authentication
      - AUTHENTICATOR_DISABLE_TIME_DRIFT=false

      # WebSockets
      - WEBSOCKET_ENABLED=true

    volumes:
      - ./data:/data

    logging:
      driver: json-file
      options:
        max-size: 10m
        max-file: "3"

    healthcheck:
      test: ["CMD", "curl", "-f", "http://localhost:80/alive"]
      interval: 30s
      timeout: 5s
      retries: 3
      start_period: 10s

    networks:
      - proxy-net

networks:
  proxy-net:
    external: true
Important configuration points
vaultwarden/server:1.37.2
The version is deliberately pinned rather than using latest. This gives you control over when Vaultwarden is upgraded.
./data:/data
This is the most important volume. It contains the Vaultwarden SQLite database and other persistent server data.
WEBSOCKET_ENABLED=true
WebSockets allow clients to receive real-time notifications and synchronisation events.
SMTP_HOST=mailrelay
Vaultwarden sends email to the existing Docker Mailrelay container. Mailrelay is responsible for onward delivery to Brevo.
SIGNUPS_ALLOWED=true
This is temporary. It allows the first account to be created.
SIGNUPS_ALLOWED=true. Once your accounts have been created, change it to false and recreate the container.Stage 5 — Add the DNS Record
In Cloudflare create:
| Type | Name | Content | Proxy |
|---|---|---|---|
| A | vault | Your public IP address | Grey cloud / DNS only |
The resulting hostname should be:
vault.plainshawk.co.uk
Do not enable Cloudflare's orange-cloud proxy for this hostname in this configuration.
Stage 6 — Start Vaultwarden
Start the container:
docker compose up -d
Watch the logs:
docker compose logs -f vaultwarden
You should see the Vaultwarden startup banner and the version number.
Press Ctrl+C once the container is running normally.
Check its status:
docker compose ps
The container should show as running.
You can also check the health endpoint:
docker exec vaultwarden curl -f http://localhost:80/alive
A successful response indicates that Vaultwarden is alive.
Stage 7 — Add the Proxy Host in Nginx Proxy Manager
Log into Nginx Proxy Manager:
Proxy Hosts → Add Proxy Host
Details
| Field | Value |
|---|---|
| Domain Names | vault.plainshawk.co.uk |
| Scheme | http |
| Forward Hostname | vaultwarden |
| Forward Port | 80 |
| Cache Assets | Off |
| Block Common Exploits | On |
| Websockets Support | On |
WebSockets are important for reliable Bitwarden client communication.
SSL
Select:
- Request a new Let's Encrypt certificate
- Force SSL: On
- HTTP/2 Support: On
Save the proxy host.
Stage 8 — Secure the NPM Configuration
Open the Advanced tab of the Vaultwarden proxy host.
Add:
# Vaultwarden requires generous timeouts for synchronisation
proxy_read_timeout 90s;
proxy_buffering off;

# Block scanners — Vaultwarden uses Rust, not PHP
location ~ \.(php|php\d|phtml|asp|aspx|cgi)$ {
    return 444;
}

location ~ /(wp-admin|wp-login|wp-content|wp-includes|xmlrpc\.php) {
    return 444;
}

location ~ /\.(env|git|svn|aws|ssh|npmrc) {
    return 444;
}

location ~ /(phpmyadmin|pma|adminer|mysql)/ {
    return 444;
}

location ~ /(shell|cmd|exec|system|passthru|eval)/ {
    return 444;
}

# Restrict Vaultwarden administration to the home network
location /admin {
    allow 192.168.178.0/24;
    allow 192.168.65.0/24;
    allow 172.16.0.0/12;
    allow 10.0.0.0/8;
    allow 127.0.0.1;
    deny all;

    proxy_pass http://vaultwarden:80;
}
The important part is the /admin restriction.
The normal Vaultwarden web vault remains accessible through HTTPS, but the administration interface is restricted to your home network and Docker Desktop's internal gateway.
192.168.65.0/24 is particularly important on macOS because Docker Desktop uses a Linux VM. Requests reaching Nginx Proxy Manager from Docker-hosted services may therefore appear to originate from the Docker Desktop gateway rather than your normal LAN address.Save the proxy host.
Stage 9 — Create Your Vaultwarden Account
Open:
https://vault.plainshawk.co.uk
Because SIGNUPS_ALLOWED=true is currently set, the registration option should be available.
Create your account using:
- A unique email address
- A strong, memorable master password
Your master password is the key to your encrypted vault.
Your master password should therefore be strong, unique and stored only in a secure recovery location. Do not put your Vaultwarden master password inside the Vaultwarden vault itself.
Stage 10 — Disable New User Registration
Once your account has been created, immediately disable public registration.
Edit:
nano ~/docker/vaultwarden/docker-compose.yml
Change:
- SIGNUPS_ALLOWED=true
to:
- SIGNUPS_ALLOWED=false
Then recreate the container:
docker compose up -d --force-recreate
Check:
docker compose ps
Registration should now be disabled.
Stage 11 — Enable Two-Factor Authentication
This is one of the most important configuration steps.
In the Vaultwarden web vault:
Settings → Security → Two-step login
Authenticator app / TOTP
Select Manage next to Authenticator App.
- Scan the QR code with your authenticator application.
- Enter the current TOTP code.
- Confirm the configuration.
- Save the recovery code somewhere secure.
Do not store the only copy of your recovery code inside Vaultwarden.
WebAuthn / Passkeys
Also configure WebAuthn.
Select Manage next to WebAuthn and add a credential using:
- Mac Touch ID
- iPhone/iPad Face ID
- A hardware security key
- Another supported passkey authenticator
Give the credential a useful name such as:
Mac Mini Touch ID
WebAuthn provides phishing-resistant authentication and is an excellent second factor.
Stage 12 — Configure the Vaultwarden Admin Panel
Open:
https://vault.plainshawk.co.uk/admin
Because of the NPM access rule, this should only work from your home network.
Enter your admin token.
General settings
Check:
- Domain URL:
https://vault.plainshawk.co.uk - Signups Allowed: Off
- Invitations Allowed: On
SMTP
The email configuration should point to Mailrelay:
| Setting | Value |
|---|---|
| SMTP Host | mailrelay |
| SMTP Port | 25 |
| Security | Off |
| From | vault@plainshawk.co.uk |
| From Name | Vaultwarden |
Use Send test email to verify the mail path.
The flow is:
Vaultwarden
    ↓
mailrelay:25
    ↓
Brevo
    ↓
Recipient
If the test fails, check the Mailrelay logs:
cd ~/docker/mailrelay
docker compose logs --tail=20 mailrelay
Stage 13 — Invite Your Partner
With registration disabled, use Vaultwarden's invitation mechanism.
Go to:
https://vault.plainshawk.co.uk/admin
Then:
Users → Invite User
Enter your partner's email address.
They will receive an invitation through Mailrelay.
They should:
- Open the invitation.
- Create their Vaultwarden account.
- Choose a strong master password.
- Configure two-factor authentication.
- Add WebAuthn/passkey authentication where supported.
The important distinction is that each person has their own Vaultwarden account and master password.
Stage 14 — Configure the Bitwarden Desktop App
The official Bitwarden applications can connect directly to your Vaultwarden server. Bitwarden's current documentation calls this the Self-hosted environment. (Bitwarden)
Install the official Bitwarden desktop application on your Mac.
On the Bitwarden login screen:
- Select the server/environment selector.
- Choose Self-hosted.
- Enter:
https://vault.plainshawk.co.uk
- Select Save.
- Enter your Vaultwarden email address.
- Enter your Vaultwarden master password.
- Complete your configured two-factor authentication.
The wording of the selector can vary slightly between Bitwarden releases; on current desktop releases it is presented as the environment/server selection.
https://. Bitwarden's documentation explicitly requires HTTPS when configuring a self-hosted server. (Bitwarden)Stage 15 — Configure the Bitwarden Browser Extension
Install the official Bitwarden browser extension for your browser.
On the extension's login screen:
- Open Logging in on.
- Select Self-hosted.
- Enter:
https://vault.plainshawk.co.uk
- Select Save.
- Log in with your Vaultwarden credentials.
- Complete two-factor authentication.
The extension should now synchronise against your Vaultwarden server rather than Bitwarden's hosted service. Bitwarden documents this same Self-hosted configuration for browser extensions. (Bitwarden)
Stage 16 — Configure the Bitwarden iPhone and iPad Apps
Install the official Bitwarden app from the App Store.
On the login screen:
- Tap the server/environment selector.
- Select Self-hosted.
- Enter:
https://vault.plainshawk.co.uk
- Tap Save.
- Log in.
- Complete two-factor authentication.
Bitwarden's current mobile instructions use the same Self-hosted server selection and require the HTTPS server URL. (Bitwarden)
Repeat this procedure on:
- iPhone
- iPad
- Your partner's iPhone
- Your partner's iPad
- Any other mobile device
After login, enable the app's biometric unlock facility where appropriate:
- Face ID
- Touch ID
- Device biometrics
This allows convenient unlocking without repeatedly entering the master password.
https://vault.plainshawk.co.uk.Stage 17 — Check Client Synchronisation
After configuring the first client, create a harmless test item such as:
Test - Vaultwarden
Synchronise the desktop application.
Then check the same item from:
- Web vault
- Desktop app
- Browser extension
- iPhone
- iPad
Delete the test item afterwards.
This proves that the complete synchronisation path is working before you migrate your real password collection.
Stage 18 — Migrate From 1Password
If you are migrating from 1Password, perform the export carefully.
Export from 1Password
On your Mac:
- Open 1Password.
- Select File → Export.
- Choose the appropriate export format.
- Save the export temporarily to your Desktop.
- Enter your 1Password master password when prompted.
Import into Vaultwarden
Open:
https://vault.plainshawk.co.uk
Then:
Tools → Import Data
Select the appropriate 1Password import format and choose the exported file.
After importing:
- Check the total number of items.
- Check several random logins.
- Check usernames and passwords.
- Check secure notes.
- Check folders/categories.
- Check TOTP secrets if they were exported.
- Check attachments if applicable.
Only after you are satisfied with the migration should you remove the export.
Remove temporary exports:
rm ~/Desktop/*.1pif 2>/dev/null
rm ~/Desktop/*.csv 2>/dev/null
Also empty the Mac Trash afterwards.
Stage 19 — Add Vaultwarden to the Startup Script
Edit:
nano ~/docker/start-all.sh
Ensure Vaultwarden starts before Nginx Proxy Manager:
echo "Starting Vaultwarden..."
cd /Users/gavin/docker/vaultwarden && docker compose up -d
The important ordering is:
Vaultwarden
    ↓
Nginx Proxy Manager
This reduces the chance of NPM starting before its upstream container exists.
Stage 20 — Add Vaultwarden to Uptime Kuma
Create an HTTP monitor in Uptime Kuma.
| Field | Value |
|---|---|
| Name | Vaultwarden |
| Monitor Type | HTTP(s) |
| URL | http://vaultwarden:80/alive |
| Heartbeat Interval | 60 seconds |
| Retries | 3 |
| Notification | Mail Relay |
Using the internal Docker hostname avoids unnecessarily sending the monitoring request through NPM.
Stage 21 — Configure Backups
Vaultwarden uses SQLite, and the complete application state is stored beneath the data directory.
Edit:
nano ~/docker/backups/backup.sh
Add:
# Vaultwarden
cp -r ~/docker/vaultwarden/data \
  $BACKUP_DIR/vaultwarden_$DATE
echo "Vaultwarden backup done"

# Vaultwarden configuration
cp ~/docker/vaultwarden/.env \
  $BACKUP_DIR/vaultwarden_env_$DATE
echo "Vaultwarden configuration backup done"
The backup therefore contains both:
Vaultwarden database/data
        +
Admin token configuration
Stage 22 — Perform a Backup and Recovery Check
Before trusting the installation, perform a test backup.
cd ~/docker/vaultwarden

cp -r ./data ~/docker/backups/vaultwarden_test_$(date +%Y%m%d)
cp .env ~/docker/backups/vaultwarden_env_test_$(date +%Y%m%d)
Check that the backup exists:
ls -lah ~/docker/backups/vaultwarden_test_*
Do not consider the backup system complete until you know where these backups are stored and how they would be recovered after a disk failure.
Updating Vaultwarden
Vaultwarden contains your most sensitive data, so updates should be deliberate rather than automatic.
The current stable release should be checked before every update rather than blindly changing the image tag.
As of this guide's August 2026 revision, 1.37.2 is the appropriate stable version for current Bitwarden clients. Vaultwarden specifically states that 1.37.2 is required for Bitwarden clients 2026.8.0 and later. (GitHub)
Step 1 — Back up first
cd ~/docker/vaultwarden

cp -r ./data ~/docker/backups/vaultwarden_preupdate_$(date +%Y%m%d)
cp .env ~/docker/backups/vaultwarden_env_preupdate_$(date +%Y%m%d)
Step 2 — Check the release notes
Review the Vaultwarden release notes before changing versions.
Pay particular attention to:
- Security fixes
- Database migrations
- Bitwarden client compatibility
- Breaking configuration changes
Step 3 — Change the image version
Edit:
nano docker-compose.yml
For example:
image: vaultwarden/server:1.37.2
Step 4 — Pull the new image
docker compose pull
Step 5 — Recreate Vaultwarden
docker compose up -d --force-recreate
Step 6 — Watch the startup
docker compose logs -f vaultwarden
Check for migration errors or other warnings.
Step 7 — Verify the version
docker exec vaultwarden /vaultwarden --version
Then test:
https://vault.plainshawk.co.uk
Finally, test at least one Bitwarden client and perform a manual synchronisation.
Important Client Compatibility Note
Vaultwarden and the official Bitwarden clients are developed independently.
This became particularly important during the August 2026 client releases. Vaultwarden's maintainer explicitly stated that Vaultwarden 1.37.2 is required when using Bitwarden clients 2026.8.0 or newer. (GitHub)
If a Bitwarden client suddenly:
- Logs in but shows an empty vault
- Cannot synchronise
- Reports authentication errors
- Stops displaying vault items
- Behaves differently from the web vault
first check the Vaultwarden version:
docker exec vaultwarden /vaultwarden --version
Then check the Bitwarden client version.
If the server is still on 1.37.1, upgrade it to 1.37.2 before troubleshooting the client.
After a Vaultwarden upgrade, it can also be worth logging out and back into the affected Bitwarden client or performing a manual synchronisation. Community reports have documented client synchronisation problems immediately following some Vaultwarden updates. (GitHub)
Quick Reference
| URL | Purpose |
|---|---|
https://vault.plainshawk.co.uk |
Vaultwarden web vault |
https://vault.plainshawk.co.uk/admin |
Administration panel — home network only |
https://vault.plainshawk.co.uk/alive |
Health-check endpoint |
Docker locations
| Location | Purpose |
|---|---|
~/docker/vaultwarden/docker-compose.yml |
Container configuration |
~/docker/vaultwarden/.env |
Admin token |
~/docker/vaultwarden/data |
SQLite database and Vaultwarden data |
Troubleshooting
Admin token warning appears in the logs
You may see:
You are using a plain text ADMIN_TOKEN which is insecure.
This means Vaultwarden is accepting a plain-text admin token.
For a stronger configuration, generate an Argon2 PHC string using:
docker run --rm -it vaultwarden/server:1.37.2 /vaultwarden hash
Then configure the resulting hash correctly, taking care to handle $ characters according to Docker Compose's interpolation rules. Vaultwarden explicitly recommends the Argon2 form. (GitHub)
Bitwarden clients cannot connect
Check the following in order:
vault.plainshawk.co.ukresolves correctly.- HTTPS is working.
- The Let's Encrypt certificate is valid.
- NPM has Websockets Support enabled.
- The Bitwarden client is configured for Self-hosted.
- The server URL is exactly:
https://vault.plainshawk.co.uk
- Vaultwarden is running:
docker compose ps
- The health endpoint responds:
docker exec vaultwarden curl -f http://localhost:80/alive
Bitwarden's official documentation confirms that self-hosted clients require the Self-hosted environment and an HTTPS server URL. (Bitwarden)
Clients log in but the vault is empty
First check the Vaultwarden version:
docker exec vaultwarden /vaultwarden --version
If you are running 1.37.1 with a 2026.8.0-or-newer Bitwarden client, upgrade Vaultwarden to 1.37.2. (GitHub)
Then manually synchronise the client or log out and back in.
Admin panel returns 401
Check that the ADMIN_TOKEN in .env is correct.
cat .env
Do not publish the resulting value.
Restart:
docker compose restart vaultwarden
If you have previously configured the admin token through Vaultwarden's configuration, remember that settings saved into data/config.json can override environment variables. Vaultwarden's own documentation recommends avoiding conflicting configuration sources. (GitHub)
WebAuthn / Passkey is not available
Check that:
https://vault.plainshawk.co.uk
works correctly.
Vaultwarden's WebAuthn functionality requires a secure HTTPS environment. (GitHub)
Do not attempt to configure WebAuthn through the plain HTTP Docker endpoint.
Email is not sending
Test the Mailrelay container:
cd ~/docker/mailrelay
docker compose logs --tail=20 mailrelay
Also verify that Vaultwarden can resolve Mailrelay:
docker exec vaultwarden getent hosts mailrelay
If it cannot resolve mailrelay, check that both containers are attached to the same Docker network.
Admin panel returns 403
This is normally expected if you are outside the permitted network.
If you are inside the house and still receive a 403, check the NPM error log:
docker exec nginx-proxy-manager \
  tail -20 /data/logs/proxy-host-*_error.log
Confirm that the source IP falls within one of the permitted ranges:
192.168.178.0/24
192.168.65.0/24
172.16.0.0/12
10.0.0.0/8
127.0.0.1
On macOS, pay particular attention to the 192.168.65.0/24 Docker Desktop range.
Attachments or vault data are missing
Check the data directory:
docker exec vaultwarden ls -lah /data
You should see the Vaultwarden database and associated files.
Also check that the host directory is mounted:
docker inspect vaultwarden \
  --format '{{json .Mounts}}'
The important mapping is:
~/docker/vaultwarden/data
        ↓
/data
Final Security Checklist
Before considering the installation complete, verify:
| Check | Status |
|---|---|
| Vaultwarden version pinned | ☐ |
| HTTPS working | ☐ |
| Let's Encrypt certificate working | ☐ |
| NPM WebSockets enabled | ☐ |
/admin restricted to home network |
☐ |
| Strong admin token configured | ☐ |
| Public registration disabled | ☐ |
| Partner invited successfully | ☐ |
| TOTP enabled | ☐ |
| WebAuthn/passkey enabled | ☐ |
| Recovery codes stored securely | ☐ |
| Mailrelay tested | ☐ |
| Bitwarden desktop app connected | ☐ |
| Bitwarden browser extension connected | ☐ |
| Bitwarden iPhone/iPad apps connected | ☐ |
| Test synchronisation completed | ☐ |
| 1Password migration checked | ☐ |
| Export files securely deleted | ☐ |
| Vaultwarden included in nightly backup | ☐ |
.env included in backup |
☐ |
| Backup recovery process understood | ☐ |
| Uptime Kuma monitor working | ☐ |
| Startup script configured | ☐ |