
Setting up an Image Gallery under Docker

Immich is a powerful, self-hosted alternative to cloud photo services such as Google Photos and Apple Photos. It provides photo and video storage, automatic mobile backups, facial recognition, smart search, albums and a web interface, while keeping the underlying library under your control.
This guide documents how I installed Immich on my Mac Mini using Docker, with the photo library stored on an external SSD and remote access provided through Nginx Proxy Manager.
The resulting setup looks like this:
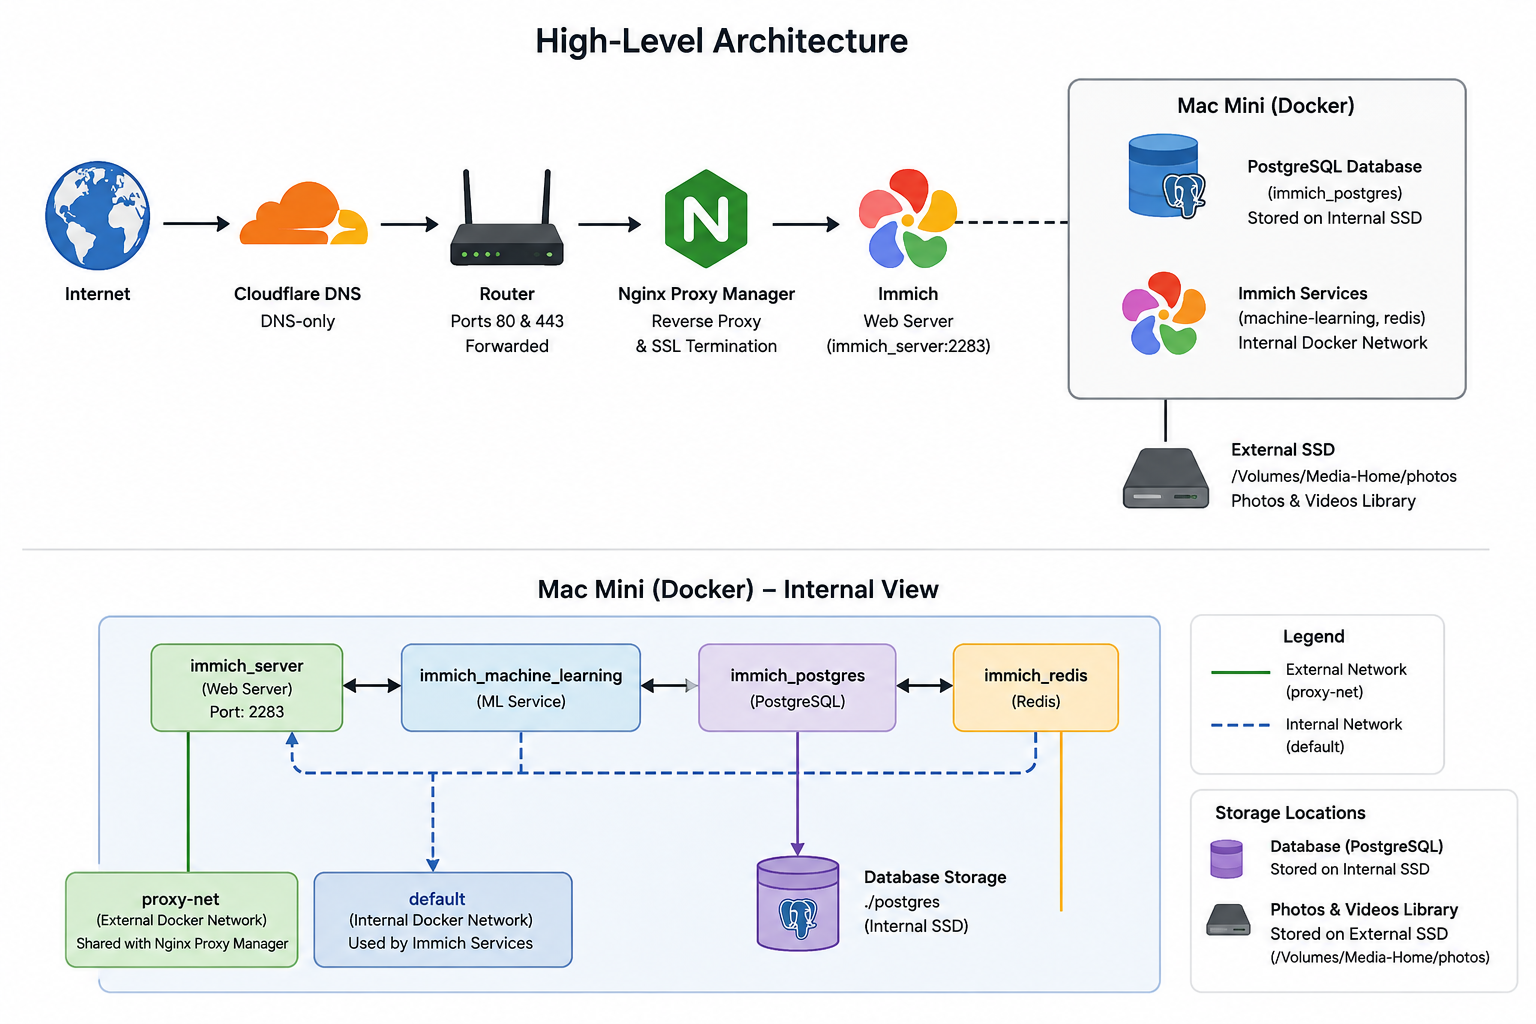
The database remains on the Mac Mini’s internal SSD, while the much larger photo and video library is stored on the external drive.
The guide also covers mobile backups, API keys, database backups, automatic startup, monitoring and the procedure I use for updating Immich.
My environment
- Mac Mini running Docker Desktop
- Immich running as a Docker Compose application
- Nginx Proxy Manager providing reverse-proxy and SSL termination
- Cloudflare providing DNS, with the DNS record set to DNS-only
- Photo and video storage on
/Volumes/Media-Home/photos - Immich database stored on the Mac Mini’s internal SSD
- Uptime Kuma used for monitoring
Before you start
Before installing Immich, I already have Docker Desktop running and Nginx Proxy Manager configured.
You will need:
- Docker Desktop running
- A Docker network called
proxy-net - Ports 80 and 443 forwarded on your router
- A Cloudflare A record for
photos.plainshawk.co.ukpointing to your public IP, with the Cloudflare proxy disabled (grey cloud)
You can confirm that proxy-net already exists with:
docker network inspect proxy-netIf the network doesn’t exist, create it before continuing.
Contents
Installation
Stage 1 — Create the directory structure
I keep each Docker application in its own directory. This keeps the Compose file, environment configuration and application-specific data together and makes the stack easier to maintain.
mkdir -p ~/docker/immich
cd ~/docker/immich
Stage 2 — Download the official Immich files
Rather than creating a Compose file from scratch, I use the official files supplied by the Immich project.
Always use the release files rather than the development branch. This keeps the Compose configuration and environment file aligned with a released version of Immich.
The commands below download the current official release versions of the Docker Compose file and example environment file.
curl -L https://github.com/immich-app/immich/releases/latest/download/docker-compose.yml \
  -o docker-compose.yml

curl -L https://github.com/immich-app/immich/releases/latest/download/example.env \
  -o .env
Stage 3 — Configure the environment
Open the environment file:
nano .envI changed the following values for my installation:
# Where your photos are stored
UPLOAD_LOCATION=/Volumes/Media-Home/photos

# Where the database is stored — keep on fast internal SSD
DB_DATA_LOCATION=./postgres

# Your timezone
TZ=Europe/London

# Track latest stable release
IMMICH_VERSION=release

# Strong database password — change this
DB_PASSWORD=choose_a_strong_password
The important distinction here is that the photo library lives on the external SSD, while the PostgreSQL database remains under the Docker project directory on the Mac Mini’s internal SSD.
Replace choose_a_strong_password with a strong, unique password. Do not use the example value in a production installation.
Stage 4 — Connect Immich to the proxy network
The standard Immich Compose file creates its own internal Docker network. My Nginx Proxy Manager installation is in a separate Docker Compose project, so I need to connect the Immich server to the existing proxy-net network as well.
Open the Compose file:
nano docker-compose.ymlFind the immich-server service and add the following networks section:
  immich-server:
    # ... existing config unchanged ...
    networks:
      - default
      - proxy-net
Then add the following at the very bottom of the file:
networks:
  default:
  proxy-net:
    external: true
Leave all other services (immich-machine-learning, database, redis) unchanged. They only need to use the internal default network.
immich-server?Nginx Proxy Manager needs to communicate with the Immich web server, so immich-server must be attached to the shared proxy-net network. The other Immich containers don’t need to be directly accessible by the reverse proxy.
Stage 5 — Start Immich
With the configuration in place, start the stack:
docker compose up -dThe first startup takes several minutes because Immich has to initialise its database and other services.
Watch the Immich server logs:
docker compose logs -f immich-serverWait until you see:
Immich Server is listening on 0.0.0.0:2283
Press Ctrl+C to stop following the logs.
Now check the status of all the containers:
docker compose psYou should see four containers running:
immich_serverimmich_machine_learningimmich_postgresimmich_redis
Stage 6 — Test internal connectivity
Before configuring Nginx Proxy Manager, I like to test the Docker networking independently.
This confirms that the Immich server is reachable through proxy-net before introducing the reverse proxy into the equation.
Run:
docker exec nginx-proxy-manager curl -s http://immich_server:2283/api/server/pingThe expected response is:
{"res":"pong"}If this doesn’t work, the Immich container isn’t correctly attached to proxy-net. Go back to Stage 4 and check the Compose configuration.
Configure remote access
Stage 7 — Configure Nginx Proxy Manager
Now that Immich is working internally, I can configure Nginx Proxy Manager to expose it through my public hostname.
Log in to Nginx Proxy Manager and go to:
Proxy Hosts → Add Proxy Host
Details
| Field | Value |
|---|---|
| Domain | photos.plainshawk.co.uk |
| Scheme | http |
| Forward Hostname | immich_server |
| Forward Port | 2283 |
| Cache Assets | Off |
| Block Common Exploits | On |
| Websockets Support | On |
SSL
On the SSL tab:
- Request a new Let’s Encrypt certificate
- Force SSL: On
- HTTP/2 Support: On
Advanced configuration
The Advanced tab needs some additional Nginx configuration.
This handles large photo and video uploads, WebSockets, Immich’s mobile discovery endpoint and a few common automated scanner requests.
# Large file uploads — required for RAW files and videos
client_max_body_size 50000M;

# Required by Immich — prevents upload stalling
proxy_request_buffering off;
client_body_buffer_size 1024k;

# Required headers per Immich docs
proxy_set_header Host $host;
proxy_set_header X-Real-IP $remote_addr;
proxy_set_header X-Forwarded-For $proxy_add_x_forwarded_for;
proxy_set_header X-Forwarded-Proto $scheme;

# Timeouts for large uploads
proxy_read_timeout 600s;
proxy_send_timeout 600s;
send_timeout 600s;

# WebSocket support — required for real-time UI updates
proxy_http_version 1.1;
proxy_redirect off;

location / {
    proxy_pass http://immich_server:2283;
    proxy_set_header Upgrade $http_upgrade;
    proxy_set_header Connection "upgrade";
}

# Required for mobile app discovery and Let's Encrypt
location /.well-known/immich {
    proxy_pass http://immich_server:2283;
}

# Block scanners — Immich uses no PHP, WordPress, or admin panels
location ~ \.(php|php\d|phtml|asp|aspx|cgi)$ {
    return 444;
}
location ~ /(wp-admin|wp-login|wp-content|wp-includes|xmlrpc\.php) {
    return 444;
}
location ~ /\.(env|git|svn|aws|ssh|npmrc) {
    return 444;
}
location ~ /(phpmyadmin|pma|adminer|mysql)/ {
    return 444;
}
location ~ /(shell|cmd|exec|system|passthru|eval)/ {
    return 444;
}
Stage 8 — Complete the first-run setup
The Immich web interface should now be available at:
https://photos.plainshawk.co.uk
Open the address in a browser and:
- Click Getting Started
- Create the admin account using a strong password
- Remember that the first account created automatically becomes the administrator
- Log in
Stage 9 — Secure the admin account
Once logged in, go to Account Settings.
I recommend doing the following immediately:
- Enable Two-Factor Authentication using an authenticator app
- Set a strong password if you didn’t already do so
- Make a note of the account email address, as you’ll need it for account recovery
I use an authenticator application for TOTP codes. My existing Vaultwarden setup can also store TOTP codes securely.
Stage 10 — Generate API keys
Immich can use separate API keys for different applications and scripts.
Go to:
Account Settings → API Keys
Create a separate key for each client that needs access.
Key Name | Permissions |
|---|---|
| Assets: Read, Albums: Read, People: Read, Libraries: Read |
| Full access (for the mobile app) |
| Assets: Read (for the backup script) |
Using a separate, minimally privileged key for each integration means that you can revoke one key without affecting the others.
Treat Immich API keys like passwords. Don’t publish them in configuration examples, screenshots or scripts that are accessible to other users.
Configure Immich
Stage 11 — Configure Immich
Go to:
Administration → Settings
Machine Learning
Enable:
- Smart Search
- Facial Recognition
These run on the Mac Mini’s CPU. The initial scan of a large library can take several hours, but subsequent scans are much faster.
Storage Template
Go to:
Administration → Settings → Storage Template
Enable the Storage Template and use:
{{y}}/{{MM}}/{{dd}}/{{filename}}This organises uploaded files into date-based folders rather than UUID-based directories.
Trash
Enable Trash with a 30-day retention period.
This provides some protection against accidentally deleting photos permanently.
OAuth
OAuth is optional, but can be useful if you eventually want single sign-on across your self-hosted services.
Immich supports OAuth and can integrate with services such as Authentik if you add one later.
Stage 12 — Configure the mobile app
Install the Immich app on your iOS or Android device.
Then:
- Open the app
- Enter your server URL:
https://photos.plainshawk.co.uk - Log in with your Immich account
- Go to Settings → Background Backup
- Enable automatic backup
- Select the albums you want to back up
Once this is enabled, the phone can automatically upload new photographs to your self-hosted Immich instance.
Backups and maintenance
Stage 13 — Add Immich to the backup script
The Immich database is important and should be included in your regular backup routine.
Open the existing backup script:
nano ~/docker/backups/backup.shConfirm that this section is present and correct:
# Immich database
docker exec -t immich_postgres pg_dumpall \
  --clean \
  --if-exists \
  -U postgres \
  > $BACKUP_DIR/immich_$DATE.sql
echo "Immich backup done"
This creates a PostgreSQL dump that can be restored independently of the running Immich containers.
Don’t confuse database backups with photo backups
The database contains Immich’s application data, metadata and configuration, but it is not a substitute for backing up the actual photo and video library.
Your /Volumes/Media-Home/photos directory needs to be included in your normal file backup strategy as well.
Stage 14 — Add Immich to the startup script
If you use a startup script to bring your Docker services online after a reboot, add Immich to it.
Open the script:
nano ~/docker/start-all.shConfirm that this appears after Nginx Proxy Manager starts:
echo "Starting Immich..."
cd /Users/gavin/docker/immich && docker compose up -d
This ensures that Immich is started automatically as part of the rest of the Docker stack.
Stage 15 — Add Immich to Uptime Kuma
I use Uptime Kuma to monitor the services running on the Mac Mini.
Add a new monitor at:
https://status.plainshawk.co.uk
Field | Value |
|---|---|
Name | Immich |
Monitor Type | HTTP(s) |
URL |
|
Heartbeat Interval | 60s |
Retries | 3 |
The monitor uses Immich’s own health endpoint rather than simply checking whether the web server responds.
Quick reference
URL | Purpose |
|---|---|
| Web interface |
| Health check |
| Mobile app discovery |
Troubleshooting
502 Bad Gateway
If Nginx Proxy Manager returns a 502 Bad Gateway, the most likely cause is that immich_server isn’t connected to proxy-net.
Check the container’s networks:
docker inspect immich_server | grep -A 5 '"Networks"'If proxy-net isn’t listed, go back to Stage 4 and check the Compose configuration.
Mobile app can’t connect
If the Immich mobile app cannot connect correctly, check that the following location block is present in Nginx Proxy Manager’s Advanced configuration:
location /.well-known/immich {
    proxy_pass http://immich_server:2283;
}
This endpoint is required for mobile app discovery.
Uploads fail over about 1 GB
Check the Advanced configuration in Nginx Proxy Manager.
The following directives should be present:
client_max_body_size 50000M;
proxy_request_buffering off;
Look for errors during startup or while processing jobs.
Photos aren’t appearing after upload
If an uploaded photo isn’t appearing in the library, run a manual library scan:
Administration → Jobs → Library → Scan All Libraries
The database takes a long time to start
This is normal during the first run.
The immich_postgres container has to initialise the database schema, which can take 30–60 seconds. Subsequent starts should be much faster.
Updating Immich
Keeping Immich updated is important, but because the application uses database migrations, I always take a database backup before applying an update.
Step 1 — Back up the database first
Run:
docker exec -t immich_postgres pg_dumpall \
  --clean \
  --if-exists \
  -U postgres \
  > ~/docker/backups/immich_preupdate_$(date +%Y%m%d).sql

ls -lh ~/docker/backups/immich_preupdate_*.sql
Check that the resulting SQL file exists before continuing.
Step 2 — Check the release notes
Before pulling the new version, check the official Immich release notes for breaking changes or manual migration steps.
 immich-app
Step 3 — Update the Compose file
Immich recommends using the latest official Compose file.
First change to the Immich directory and make a backup of the existing Compose file:
cd ~/docker/immich
cp docker-compose.yml docker-compose.yml.bak
Then download the latest official version:
curl -L https://github.com/immich-app/immich/releases/latest/download/docker-compose.yml \
  -o docker-compose.yml
There is an important detail here: the official Compose file won’t contain my custom proxy-net configuration.
I therefore need to add those sections again.
Open the file:
nano docker-compose.ymlAdd this to the immich-server service:
    networks:
      - default
      - proxy-net
Then add this at the bottom of the file:
networks:
  default:
  proxy-net:
external: trueIf you replace the official Compose file during an update, remember to restore these proxy-net sections before restarting Immich. Otherwise Nginx Proxy Manager will no longer be able to reach immich_server.
Step 4 — Pull and update
Pull the new images:
docker compose pull
docker compose down && docker compose up -d
Step 5 — Watch the logs
Monitor the Immich server while it starts:
docker compose logs -f immich-serverImmich performs database migrations automatically during startup.
Wait for:
Immich Server is listening
Do not interrupt the process while database migrations are taking place.
Step 6 — Verify the installation
Open:
https://photos.plainshawk.co.uk
Confirm that:
- You can log in
- Your photos and albums are intact
- There are no errors in the Immich interface
Once everything is working, old Docker images can be removed:
docker image prune -fFinished
At this point Immich is running on the Mac Mini, with the photo library stored on the external SSD and the database on the internal SSD.
It is available remotely through Nginx Proxy Manager and Cloudflare DNS, supports automatic mobile backups, has separate API keys for its integrations, and is included in the database backup and monitoring routines.
Most importantly, the installation is now reproducible. The Docker configuration, reverse-proxy settings, backup procedure and update process are all documented, which makes future maintenance considerably easier.